How to Knit a Hat On Straight Needles (Tutorial)
May contain affiliate links (what's this?)Learning how to knit a hat is a fun and rewarding experience. If you’ve just completed your first scarf, and you’re looking for a new challenge, then this hat is it!
This free hat pattern is called the Blank Slate Hat because it’s a simple, classic design that can be decorated and embellished to suit your taste and personality (more on that below).
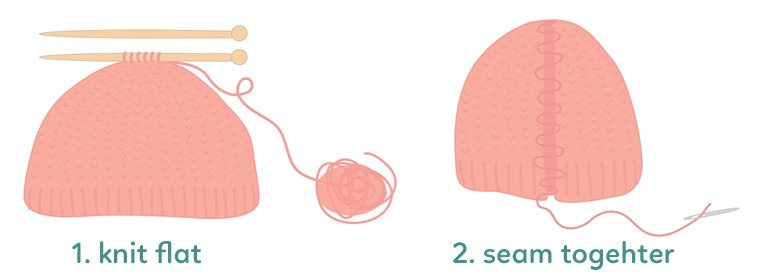
The hat is knit flat on straight needles and then seamed together with mattress stitch for an invisible join.
To knit the Blank Slate Hat successfully, you should be comfortable knitting, purling and casting on. Other techniques, like decreasing and seaming, will be covered in the video tutorial below.
Ready to learn how to knit a hat? Let’s get started!
Buy the PDF Pattern
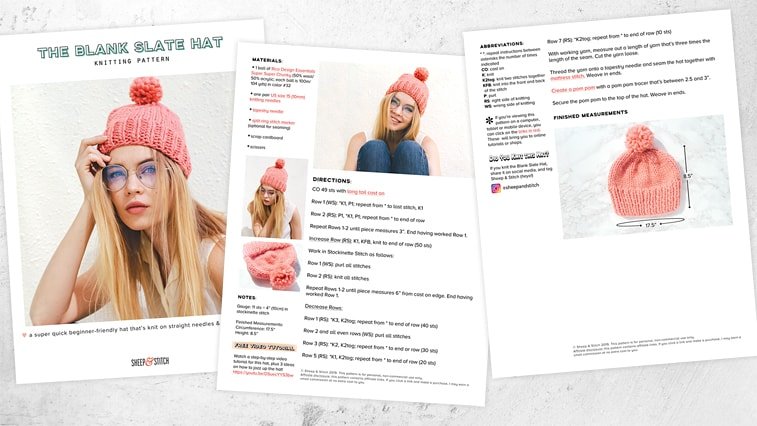

For the price of a fancy coffee, you can support Sheep & Stitch by purchasing a PDF file of this pattern. This PDF file is beautifully laid out and ready to be printed out by you!
Upon purchase, the pattern PDF file will be delivered to you by email. Click the button above or visit the shop. Thank you for your support!
Materials & Notes
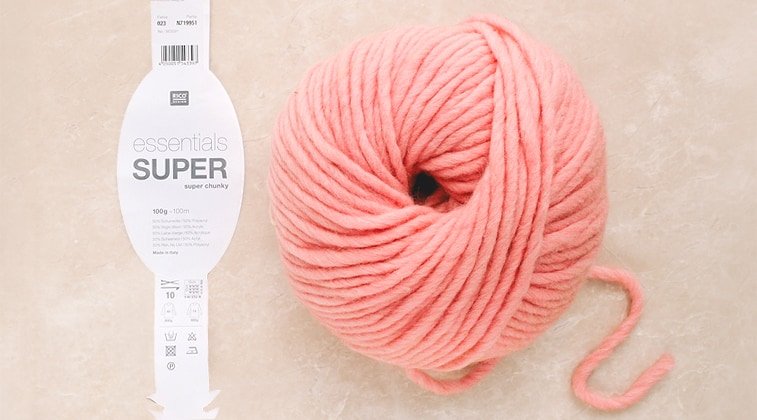
Yarn Used: 1 ball of Rico Essentials Super Super Chunky Yarn (50% wool/50% acrylic; 105yds/100g) in color 32
Other Similar Yarns:
- Lana Grossa Ragazza Lei (merino one-ply)
- Lion Brand Hometown USA (budget acrylic option) in color Ft Lauderdale Coral
- Malabrigo Rasta (gorgeous hand-painted yarn) in color Almond Blossom
Recommended Needles: 1 pair of US 15/10mm knitting needles (acrylic option) (bamboo option) Use a needle size that gives you the gauge listed below
Gauge: 11 sts = 4 inches/10 cm in stockinette stitch
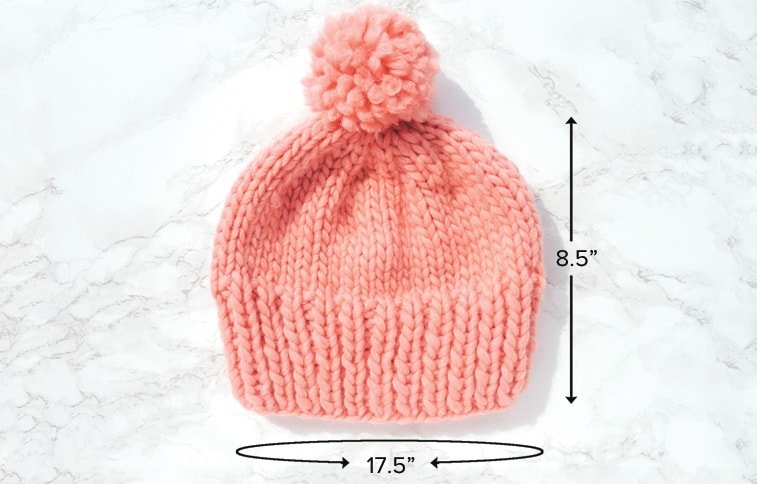
Finished Measurements: circumference is 17.5″ and height is 8.5″
Notions:
- tapestry needle
- scrap cardboard
- split-ring stitch markers (optional)
- sharp scissors
Favorite Jewels & Appliques (0ptional):
- Assorted sequin appliqués
- Rhinestone appliques
- Handmade Flower applique
- Love & Peace appliqué
- Chanel No. 5 applique
- Assorted jewel buttons
How to Knit a Hat Video Tutorial
For a step-by-step walkthrough of this hat pattern, watch the video tutorial below. It goes through the entire Blank Slate Hat pattern from beginning to end.
The video also covers three ways to embellish the hat so that it’s no longer a “blank slate” but a unique expression of your taste and personality.

Instructions
(To download the pattern instructions as a PDF, scroll to the bottom of the page)
Cast on 49 sts with long tail cast on
Row 1 (WS): *K1, P1; repeat from * to last stitch, K1
Row 2 (RS): P1, *K1, P1; repeat from * to end of row
Repeat Rows 1-2 until piece measures 3”. End having worked Row 1.
Increase Row (RS): K1, KFB, knit to end of row (50 sts)
Work in Stockinette Stitch as follows:
Row 1 (WS): purl all stitches
Row 2 (RS): knit all stitches
Repeat Rows 1-2 until piece measures 6” from cast on edge. End having worked Row 1.
Decrease Rows:
Row 1 (RS): *K3, K2tog; repeat from * to end of row (40 sts)
Row 2 and all even rows (WS): purl all stitches
Row 3 (RS): *K2, K2tog; repeat from * to end or row (30 sts)
Row 5 (RS): *K1, K2tog; repeat from * to end of row (20 sts)
Row 7 (RS): *K2tog; repeat from * to end of row (10 sts)
With working yarn, measure out a length of yarn that’s three times the length of the seam. Cut the yarn loose.
Thread the yarn onto a tapestry needle and seam the hat together with mattress stitch. Weave in ends.
Pom Pom
Create a pom pom with a pom pom tracer that’s between 2.5 and 3”.
Secure the pom pom to the top of the hat. Weave in ends.
Abbreviations:
* *: repeat instructions between asterisks the number of times indicated
K: knit
K2tog: knit two stitches together
KFB: knit into the front and back of the stitch
P: purl
RS: right side of knitting
WS: wrong side of knitting
Embellishing the Hat
So, you’ve learned how to knit a hat, and now you want to add some personality to it. Great!
I have three easy ideas for jazzing up the blank slate hat. Let’s get into them.
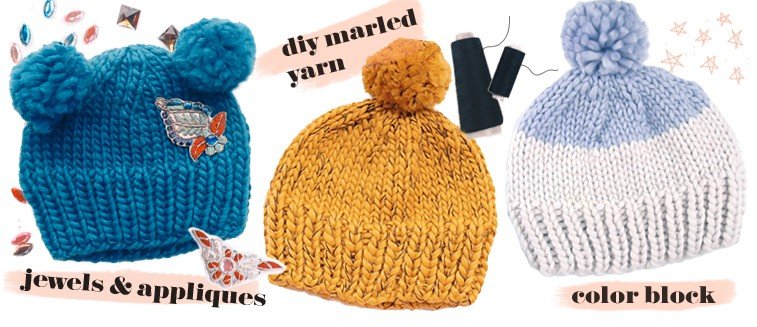
1. Color Blocking
Color blocking is a fun way to mix big blocks of colors together – hence the name “color blocking.”
Some great color combinations are complimentary colors. These are colors that sit opposite to each other on the color wheel. These include red and green; orange and blue; and purple and yellow.
For a subtle color block look, you can mix different shades of the same color. For instance, pink and red and pastel blue and dark blue are satisfying combinations.
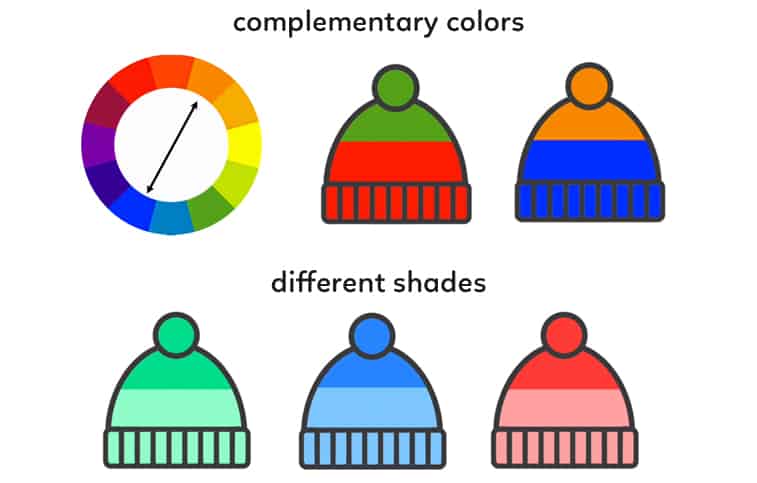
Look for more color inspiration from your favorite sports team, country’s flag or Hogwarts House!
To color block the Blank Slate Hat, choose two colors to work with – let’s call them color A and color B. (To view this in action, watch the video above and skip to 40:42 for color blocking)
Knit the hat as normal with color A. When you reach the decrease rows, switch to color B:
Insert the right needle into the first stitch of decrease Row 1. Instead of using color A to knit, pick up color B, wrap it around the right needle and pull the yarn through the first stitch.
You’ve now knit one stitch in color B! Continue knitting decrease row 1 with color B.
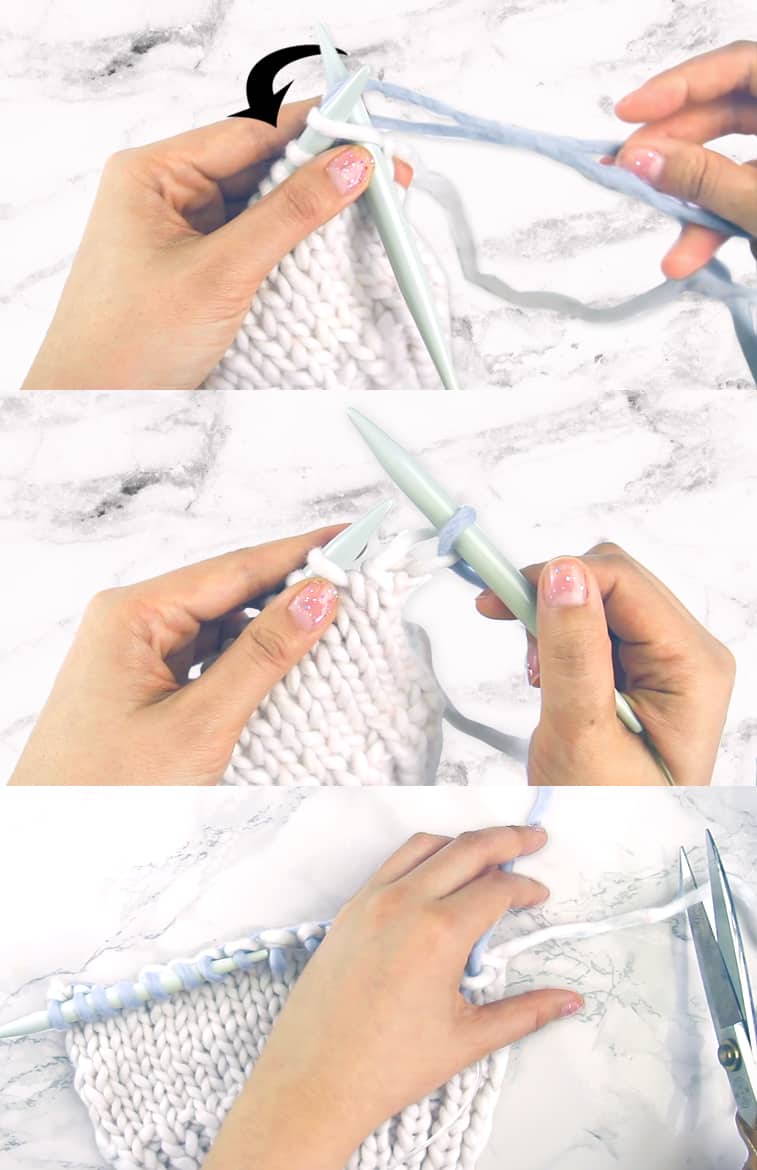
After knitting decrease row 1, cut off color A, leaving a 5″ tail. You can later weave the tail into the knitting. Continue knitting the rest of the hat with color B. And that’s it!
2. DIY Marled Yarn
Making your own marled yarn is a lot easier than it seems.
All you need is some sewing thread. For my marled hat, I held three strands of cotton sewing thread together with my yarn, creating a kind of franken-yarn.
Then, I knit the entire Blank Slate Hat with my franken-yarn. That’s it! To view this in action, watch the video above and skip to 43:07.
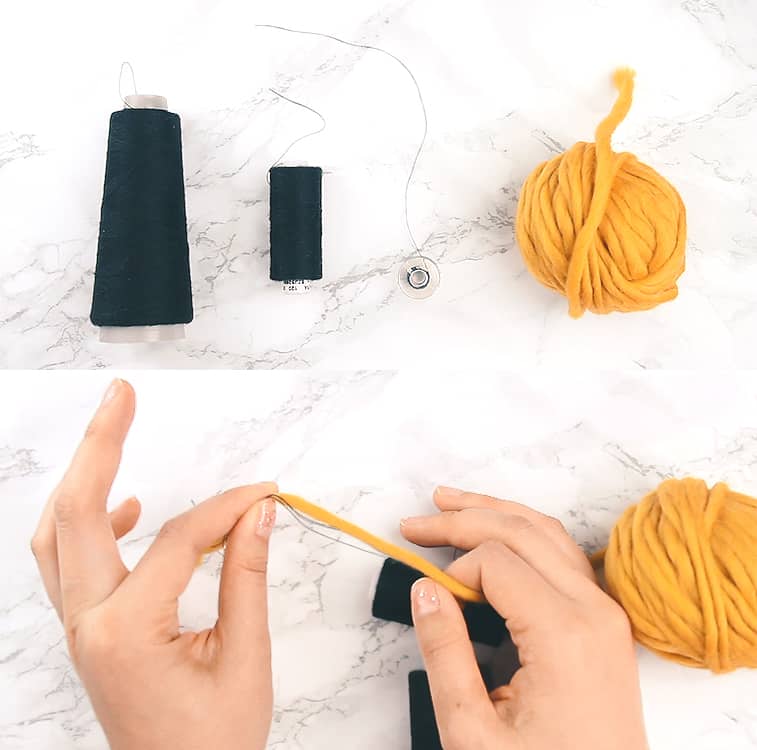
I’m holding three strands of sewing thread together because I find that it makes a bolder marled yarn. However, experiment to see how many threads you need to get the look you want.
3. Jewels & Appliques
A great way to add shine and drama to your new hat is by attaching appliques and jewels.
For jewels, I recommend finding ones that allow you to sew them to the hat. They should have two small holes that you can stick a sewing needle into.
This allows you the flexibility to play around with the jewel’s placement. It also means you don’t have to glue the jewels onto your hat (primal scream!)
To view this in action, watch the video above and skip to 44:36 for jewels and appliques.
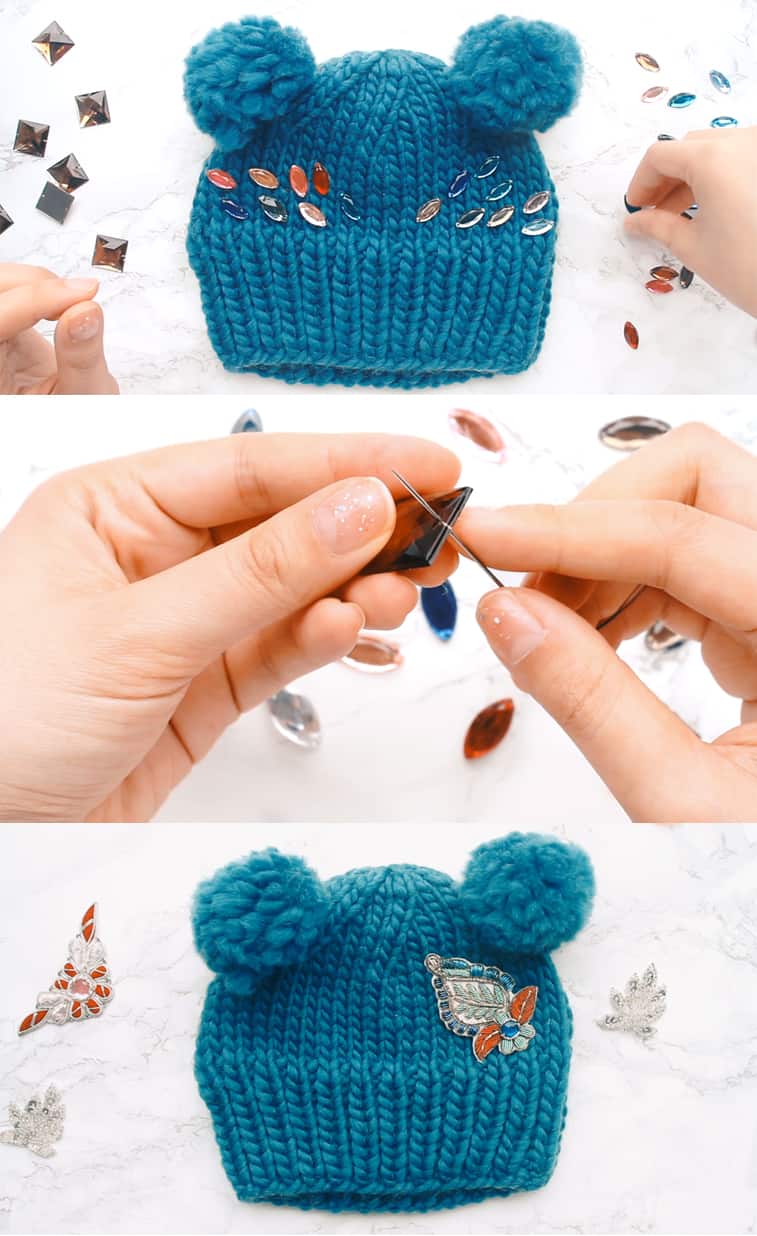
To attach an applique, simple find the right placement on your hat and sew the applique in place with a sewing needle and thread.
And that’s a wrap on the Blank Slate Hat! If you knit this hat, please tag me on Instagram @sheepandstitch. (I would love to see your hat!) If you have a Ravelry account, add your hat to the Blank Slate Hat project page here.
Support Sheep & Stitch!
While the pattern instructions and video tutorial are free and available above, for the price of a fancy coffee, you can support Sheep & Stitch by purchasing a PDF file of this pattern. This PDF file is beautifully laid out and ready to be printed out by you!
Upon purchase, the pattern PDF file will be delivered to you by email. Thank you for your support!
Hello, Ms. Davina!
You are the first person to teach me how to knit. And, i’m only 11 years old! Thank you so much for your great, helpful videos! I hope you keep on teaching people like me to knit as great as you do.
I have a question, though. What is difference between knit stitching (is that what knitters call it, I don’t remember– sorry) and purl stitching? They look the same…
But, thank you!
Hi Roche!
Thanks for your comment! I’m so happy you learned how to knit through this site! That’s so wonderful!
As to your question, the knit and purl stitch are very similar, but they are different stitches. This is more info on the knit stitch: https://sheepandstitch.com/library/knit-stitch-for-total-beginners/ and this is a video on the purl stitch: https://youtu.be/N_y-4iAk9js
You’ll see that when you work a knit stitch, the yarn is in the back, while when you work a purl stitch, the yarn is in the front. A purl stitch looks like a little bump whereas a knit stitch looks like a flat V-shape.
I hope that helps!
Hi Dabina! I’m eleven as well !your videos taught me how to knit and teaches me new skills I just watched a video about gauze you make it sound soooooo easy. You have helped me and my twin increase our skills though sometimes I don’t understand what you are saying (I’m British ) thank you so much for helping my new hobby
Hi ! Thank you so much davina you taught me how o knit to and I am 11 as well though some times I’d don’t understand your American accents (I’m British) I just watched your video about gauge you make it sounds so easy
Can this hat patter be knitted in a round?
I wondered the same thing. Did you get a response ? Thank you
I just finished knitting this Hat in the round. The only change to the pattern that I made was to cast on 50 stitches as you need an even number of stitches to knit the 1×1 rib.
Is the recommended yarn for this soft? (Rico Essentials Super Super Chunky) I just don’t want something super scratchy.
Hi Sinead, sorry for the late reply. Yes, the Rico is extremely soft – not scratchy at all.
I really want to make this hat but it will be too small. I must have a big head. Haha. How would I make it’s circumference a couple inches bigger and a inch or so taller???
I love your videos! Thanks so much!!!
I love this pattern but it will be to small for me. How do I make its circumference a couple inches bigger and make it an inch taller? Thanks so much!!!
Just wondering, the length of the hat is perfect but I need a bigger circumference. Is there a way to adjust pattern for this? Thank you so much for this by the way. Really hard to find a pattern to knit a hat on straight needles. Gonna get some round ones for xmas yippee!!
Hi great tutorial & pattern.
How would I increase this to fit a 24″ head please
I’ve learned nearly all of my knitting skills from your tutorials, they are so clear and easy to follow 😊
Thank you!!!
Made my first hat with this pattern thank you! I’d like to make a matching one for my daughter. What adjustments do I need to make to make it smaller?
Hi Davina
I’ve only ever been able to knit straight lines before – scarves or phone socks! Your video really helped me and I just finished my first ever hat!!
Thanks
Lucy
Cornwall, England
Just completed the hat whilst in isolation with COVID 19 😦
That was not fun, but learning to knit the hat was.
Great tutorial for a beginner, so easy to follow – Thank you 😊
Hi Davina! I have knit your straight needles beanie and your chunky scarf, and I’m so proud of myself. Thank you for being such a fantastic teacher, and so generous with your patterns and instructions for beginners! You make knitting fun and accessible for people. Hands down, the best knitting instruction videos on YouTube.
Very grateful to you!
Thank you for your kind words! So happy to be part of your knitting journey!
Love this! Is there a way to adjust the size or any tips to how to do so? I am assuming if using different weights of yarn I can sort of get it slightly smaller or bigger? Thanks!
Hi Davina! Firstly thank you so much for sharing this pattern and your incredibly clear video tutorial. I would be so grateful if you would explain how I could scale this down for a child? New to knitting so just not sure how it would work. I am thrilled with the hat I’ve made for myself and can’t wait to knit them up for the kids too. Thank you so much for any advice you can offer! Rachel
can you help me find the down load for that sheep and stitch hat? Im having hard time
Thanks
Where can I download the flat knit hat pattern for free? I only see for £4.
The pattern is right in this post, under “Knitting Instructions.” The download needs to be purchased but you can follow the instructions right on this page or copy and paste it into a word processor and print it out yourself.
Thank you so much for this tutorial. I am new in knitting. How many stitches would you cast for the same hat using thinner yarn. The tension of my yarn is 10cm X 10cm is 22 stitches and 30 rows. Size of needles recommend is 3.24 to 4mm. Not sure whether this information helps you to answer me. Thanks.
I made this hat twice and both times the circumference was way too big. I was wondering if it would help for me to just use 29 or 39 stitches at first, and then do the rest.
You videos are so helpful and it made knitting a lot easier for me! Thank you so much!!!
i’m having trouble finding a 10mm yarn, but plenty of 9mm. would it be ok to use this pattern with a 9mm yarn? and make sure the knitting gauge that is the same?
thanks so much, i’m new to knitting and love your tutorials!
HELP! I just finished it and this was so much fun! Yes, your video is awesome. But..it doesn’t fit me. I don’t see anything about the size or if it’s for a child or adult. Maybe I did my cast on too tight?
Hi! Does your knitting gauge match the gauge of the hat pattern? Please see this post on knitting gauge if you’re not familiar with the concept: https://sheepandstitch.com/library/what-is-knitting-gauge-and-why-you-should-care
I started working on this hat as my second knitting project, only to realise that my needles are far too small (4mm ones). would I be able to just treat what I’m working on now as one half, make another one, then stitch the two together? If so, how? Would I just mattress stitch them?
I haven’t tried this before, but it sounds really interesting! I don’t have any advice on whether this could work or not. My gut says it could! And yes I would suggest mattress stitch to seam the two pieces together. Good luck!