• Skip to primary navigation
  • Skip to main content
  • Skip to primary sidebar
  • Skip to footer

Sheep and Stitch

Knitted goodness made by you

  • About
  • Start Here
  • Patterns
  • How To Knit
  • Knitting Library
  • Blog

How to Knit an Infinity Scarf Beginner Pattern (Cushy Cowl)

Published on December 22, 2018 By Davina | May contain affiliate links (whats this?)

An infinity scarf is a bit more challenging than a regular scarf, but not so hard as to scare off beginners.

It’s a project that introduces a few essential techniques that will move you beyond noob territory and closer to the realm of hats, socks and mittens!

Best of all, this infinity scarf is knit with super bulky yarn, which produces a thick fabric that highlights the sculptural and springy qualities of garter stitch. Super bulky yarn also knits up quick for instant gratification! Win-win!


Materials & Notes

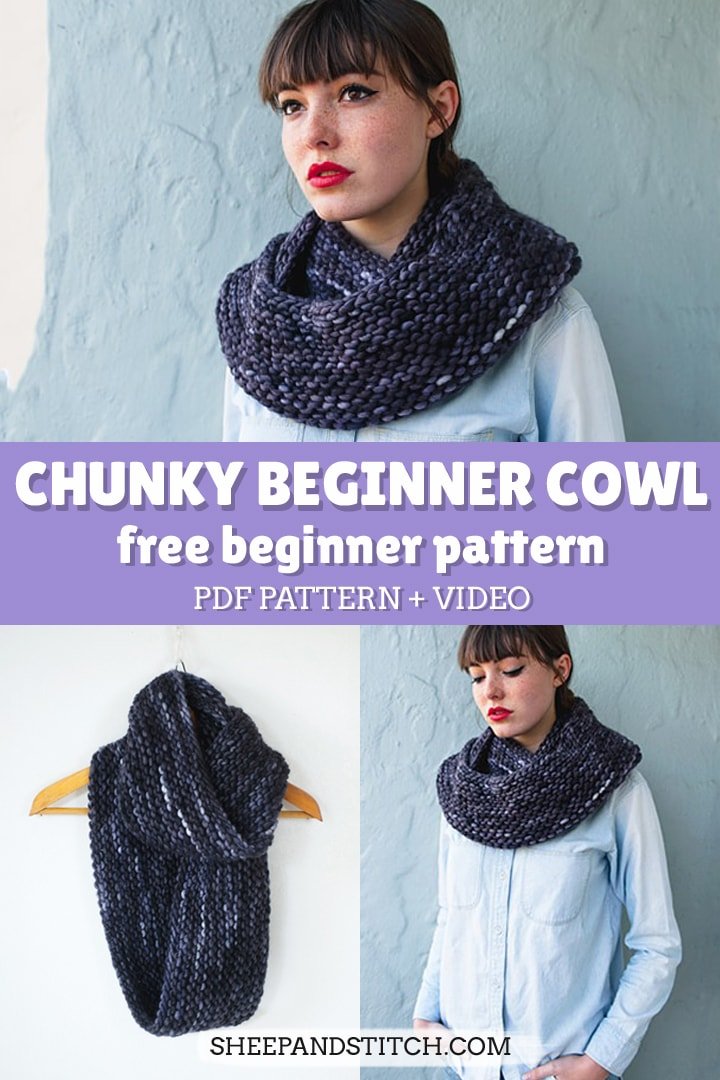
Yarn: 2 skeins of Malabrigo Rasta Super Bulky Yarn in color Pearl Ten

Recommended Needles: 1 pair of 32″ US 17/12mm circular needle (use a needle size that gives you the gauge listed below – every knitter’s gauge is unique!)

Notions: 

  • large stitch markers
  • retractable soft tape measure (similar)
  • sharp scissors (similar)

Finished Measurements: circumference is 50” and width is 7”

Gauge: 8 sts = 4″(10cm) in garter stitch

Instructions:

Using the long-tail cast on, cast on 100 stitches and join in the round, making sure not to twist stitches.

Place a stitch marker to mark the beginning of the round.

Round 1: knit all stitches to end of round

Round 2: purl all stitches to end of round

Repeat these two rounds until piece measures 7″ or desired width.

Bind off loosely on a knit row and weave in ends.

Did You Make the Cushy Cowl? Share your project on Ravelry (aka. Facebook for knitters), add your project for the Cushy Cowl and see all the other Cushy Cowls made by knitters around the world!

You can download the pattern as a PDF file below. For best viewing, save and open the file in Adobe Reader or Preview (for Mac users). Scroll down the page to download the pattern PDF.

download knit slouchy hat free pattern

girl wearing an infinity scarf

Pin
Share
Tweet
Pin
Share
Tweet

Categories: Cowls / Difficulty: Beginner / Yarn Weight: Super Bulky / Price: $0.00

Reader Interactions

You May Also Like

chunky hat knitting pattern freeHow to Knit a Chunky Hat for Beginnersgnome ornament diyDIY Gnome Ornament (quick crafty holiday gift!)infinity scarf free knitting pattern for beginnersHow to Knit an Infinity Scarf Pattern for Beginners

Comments 105

  1. Lavonda Roberts says

    February 27, 2014 at 11:17 pm

    I have loved watching your “learn to knit” videos and I am excited to try my hand at the cushy cowl scarf. A friend of mine was a wonderful knitter and tried to teach me years ago and I did learn the stitches but never learned to make anything with them except dish cloths. I didn’t ever figure how to bind off so she always had to do it for me. I went back to crochet and haven’t tried again. While watching your videos I truly learned how to cast on, knit, purl, and cast off. I also learned how to do the long-tail cast on and now can make these beautiful cushy cowl scarves for my Christmas list next Christmas. I have 2 daughters and 3 granddaughters to make for plus a friend and her 2 daughters. I know that I can easily get 2 maybe 3 of these made per day, so I will be done with these in just a week or so. Thank you so much for a tutorial that is very easy to understand and follow. I can now say I am a beginning knitter who can make something all on her own. I’m smiling! and I know my Girls will love wearing the fruits of my labor in my new found craft. love it

    Reply
    • Davina says

      February 28, 2014 at 3:56 am

      Hi Lavonda! I’m delighted the How to Knit videos have helped you out! And – oh my gosh! – I’m so pleased you mastered the longtail cast on. It’s a bit finicky, right? But it’s so, so useful. Best of luck in getting 3(!) cowls done a day. I think you can do it. Invite some friends over, have some tea, knit those cowls. It’ll be a blast!

      Reply
    • Diane Fisher says

      January 19, 2021 at 6:00 am

      I love your tutorials! I just learned how to net and it was because of your videos. I can’t stop now!

      Reply
  2. Johanna says

    March 2, 2014 at 3:46 am

    Thank you SO much for the videos and website!
    As a person that knows nothing about knitting, I’d like to ask you to create a post with tips about the materials we need to buy, such as good brands, good needles, kinds of yarn…

    Thanks a lot!
    I am sure I found a new hobby!
    🙂

    Reply
    • Davina says

      March 2, 2014 at 4:20 am

      What a good idea! I’ll put that on my docket. Thanks for your suggestion, Johanna!

      Reply
  3. Shy says

    March 2, 2014 at 8:44 pm

    Hello!

    I have been watching and re-watching all your videos and I am starting to get the hang of knitting! Yay.

    One question: I seem to back myself into a corner with making my knit so tight that I can barely get the needles into the next knit. I can’t tell which part I am making too tight that causes this to happen?

    Thanks for your help!

    Reply
    • Davina says

      March 3, 2014 at 11:44 pm

      Hey Shy! That is awesome! I’m so glad you’re getting the hang of knitting.

      As for tightness: that’s totally normal. Most beginner knitters are nervous about their stitches slipping off the needle, so they grip the needles and pull the yarn really tight when they’re making their stitches.

      One solution is switching to big wooden needles. Something like a 6mm and above is a good size. The ones I use in the video are 7mm. Wooden needles are less slippery to hold, and they grip your stitches better than steel or aluminium needles. So if you can, get yourself a pair to practice with.

      Another solution is to practice knitting with wool yarn. Nothing fancy, just some plain wool you can pick up at a dollar store or at Michaels, preferably heavier, like a heavy worsted or chunky weight. Wool is less slippery. It’s “grippier” for lack of a better world, so combined with a pair of wooden needles, you’ll have a great setup.

      The last solution is… practice! The reason why you’re pulling your stitches so tight is because you’re nervous they’ll fall off your needle. Totally normal. However, the more you practice knitting, the less nervous you’ll become and the less tightly you’ll grip your needles. You’ll also become more confident in your hands and the way they move around your needle. As the saying goes, practice makes perfect!

      Okay, this is getting to be an essay! First thing is: get a pair of wooden needles, preferably 6mm and above. Second: get some cheap, heavier-weight wool. Third: practice!

      I mentioned the weight of wool. If that’s confusing, check out this post on yarn weight: https://sheepandstitch.flywheelsites.com/yarn-weight/

      I hope this helps, Shy!

      Reply
      • Shy says

        March 5, 2014 at 12:11 pm

        Thanks for the advice!! I was wondering if I was doing something wrong but it’s good to know this is usual! I will be making a shopping trip soon 😉

        Reply
  4. Tracy says

    March 8, 2014 at 1:32 pm

    Great video!

    Reply
  5. Nathan says

    April 2, 2014 at 9:47 pm

    If it’s a personal project for yourself and you’re using animal fiber like 100% wool, you can use a technique like spit join. Otherwise you can splice the yarn with a yarn needle if it’s not animal fiber. Both techniques literally join both yarns into one.

    Just a thought.

    Reply
    • Davina says

      April 2, 2014 at 10:32 pm

      Spit join! Yeah! You’re giving me some good ideas for future tutorial videos.

      Reply
  6. Nathan says

    April 2, 2014 at 10:00 pm

    Is there a reason it seems like there is a bit of a seam even though it was knitted in the round?

    Reply
    • Davina says

      April 2, 2014 at 10:31 pm

      Hey Nathan! Nice observation! When you knit garter stitch in the round, each new row will be higher than the one you just finished, so you’ll see a slight join where your new row meets your last row. That’s the “seam” that you’re seeing.

      If you’d like no seam, you can do this:

      When you begin a new purl round: Take the marker off your needle and with your yarn held in the back, slip the next stitch, purlwise, from your left needle to the right needle. Then put the marker back on your needle and purl the next round (including the stitch you slipped).

      On the knit round: remove your marker and slip the first stitch from left needle to right needle, knitwise. Replace your marker and knit the round (including the stitch you slipped).

      You can repeat these two rows to get a “seamless” garter stitch. What we’re doing is raising the first stitch of the last row up to the level of the new row so there’s less of a visible “seam.” The thing to remember is this: doing this moves the beginning of your round one stitch to the left, so the beginning of your round is “traveling” across your work.

      This is a *slightly* advanced technique, which is why I didn’t want to introduce it to the cushy cowl since it’s a beginner project! But you’ve given me an idea to include an add-on video tutorial demonstrating this technique for those who want the extra challenge.

      Reply
      • hrhzilla says

        January 22, 2016 at 10:10 am

        When you say “including the stitch you just slipped” you mean as the last stitch in the round you’ve just started, right? You slip the stitch, stitch all the other stitches in the round, and then knit or purl that slipped stitch as the 100th stitch?

        Reply
        • Davina says

          January 27, 2016 at 12:30 am

          Yes, that’s correct!

          Reply
      • Sarah B says

        November 25, 2016 at 10:47 am

        Hi and thank you for your videos. I have knit a bit in the past, mostly scarves, including many unfinished. Decided to start again, made a few dishcloths last week to practise something new. Then the cushy cowl. I did this slipping first stitch technique. I do still have a seam, it just travels diagonally. And my cast on/cast off/joining is a bit visible too. I will make another to practise. Maybe because I was using 10 needles with bulky instead of super bulky, the stitches are slightly looser.

        Reply
  7. Harrison says

    April 15, 2014 at 9:45 pm

    I started to cast on with long-tail, but it seemed like my tail never got any shorter. I got to the 100 stitches and I had so much left I ripped it out to start over. Is there a reason this could be happening?

    Reply
    • Davina says

      April 16, 2014 at 11:07 am

      Hey Harrison! If everything else is working out, it might just be that you apportioned too much yarn for the longtail! It happens. The wrapping-around-the-needle way to measure is a good rule of thumb, but it’s not a sure-fire way to get an exact length. Once you get comfortable casting on with the longtail, you might develop a sixth sense for how much yarn to apportion. It’s usually a bit of trail and error, but the wrapping-around-the-needle is a good place to start because it rarely ever gives you too *little* yarn. Hope this helps!

      Reply
  8. Suzanne C. says

    August 4, 2014 at 12:00 pm

    I’m in love with your how-to videos and I totally think I can learn to knit. And your cast on is by far the easiest I have seen. Thank you much!

    Reply
    • Davina says

      August 5, 2014 at 1:50 am

      Suzanne! That’s awesome! So glad I can help. Best of luck knitting the cushy cowl! And share a picture here if you do knit it up!

      Reply
  9. Danielle says

    September 25, 2014 at 6:42 pm

    Hello, 🙂
    So far this website has really helped me learn the basics and has made it really fun, thank you! My question is: my needle set only goes up to a size 15 and the store doesn’t have a size 17 with a long enough cord. Do you think a 15 would work for the cowl? I could always go online but I’m anxious to start. 🙂
    Thanks!

    Reply
    • Davina says

      September 27, 2014 at 8:59 pm

      Hey Danielle,

      Yes! For sure you can use a US 15 needle. If you’re using super bulky yarn, you might want to cast on a few more stitches to get a comparable length to the Cushy Cowl.

      OR if you want to be really exact, you can knit a little garter stitch swatch with your yarn and your US 15 needles and measure out how many stitches make up an inch. Then take that number and multiply by 50. That number is the number of stitches to cast on if you want a 50″ cowl (which is the length of the Cushy Cowl).

      Hope this makes sense!

      Reply
  10. Joyce says

    November 8, 2014 at 9:58 pm

    Thanks so much for a fun and informative video !

    Reply
  11. Ivana says

    November 19, 2014 at 5:00 pm

    hi
    I love your cushy cowl but the pdf isn’t working. Please help!!! Really want to download it but all the letters are piled on each other.

    Reply
    • Davina says

      December 9, 2014 at 3:10 am

      Hi Ivana, So sorry for the late reply. If the PDF is still not showing properly, shoot me an email at davina@sheepandstitch.com and I can email you the PDF or a large jpg of the PDF.

      Reply
  12. Yolanda Hernandez says

    November 22, 2014 at 7:03 am

    Do you have to use the conected knitting needles? Im so excited to start but i just learned 3 days ago and i bought thr straight regular ones? HELP LOL

    Reply
    • Davina says

      December 9, 2014 at 3:43 am

      Hi Yolanda, yes, you really do need the circular needle (the big long one with a flexible cord) to make the Cushy Cowl. It’ll be pretty impossible to knit the cowl on regular straight needles. However, you could knit a similar cowl with straight needles by casting on a number of stitches (depending on your yarn weight and the width that you like) and then knitting a long scarf. Once you cast off, you can sew the two ends of your scarf together, thereby making a cowl!

      Reply
      • NewKnitter says

        December 15, 2014 at 12:44 am

        Hi Davina,

        Thank you for your knitting videos, it’s so easy to follow along with them 🙂

        I wanted to ask you a question about the suggestion you gave about making a cowl with straight needles and sewing the ends of the scarf together. I’m trying to knit a cowl/circle scarf and only have straight needles as well. And so I was wondering after knitting and casting off the regular long scarf, is there a specific technique or way to sew the two ends together? Or in other words, (sorry if this sounds like a very newbie question ><) how exactly would I sew the two ends together?

        Thank You!

        Reply
        • Davina says

          December 16, 2014 at 2:24 am

          Hey New Knitter,

          I would recommend using the backstitch to seam the two ends together. It’s frequently used in sewing. I don’t have a tutorial on that yet, but this is a decent tutorial: https://www.instructables.com/id/How-to-Sew./step5/Backstitch/

          Hope it helps!

          Reply
          • NewKnitter says

            December 16, 2014 at 6:19 pm

            Hi Davina,

            Thanks for your reply! Okay cool, I’ll try that out 🙂 Thanks for the link!

            And just wanted to clarify, would I be using yarn or sewing thread to sew the two ends of the cowl together?

            Thanks for your help 🙂

            Reply
            • Davina says

              December 22, 2014 at 12:52 am

              Definitely use your yarn to seam! No sewing thread! At worst, your sewing thread may actually cut into your yarn :S

          • NewKnitter says

            December 26, 2014 at 3:35 am

            Hi Davina,

            Ah okay lol gotcha, use yarn to sew the ends together, not thread. Thanks for the clarification! And Merry Christmas! : )

            Reply
  13. Erika says

    December 5, 2014 at 1:52 pm

    Thanks for this video! I’m just learning to knit and this is by far the easiest video out there that explains the basics so well.

    So I’ve got my 7″ and just finished a knit row, not sure I’ll have enough yarn to do a purl row then cast off. Is it possible to cast off in a purl row?

    Reply
    • Davina says

      December 9, 2014 at 4:14 am

      Hey Erika, Absolutely you cast off on a purl row! It’s the same technique as a regular knit cast off, except you purl instead of knit: purl 2 sts and pull the first stitch (the one on the far right) over your second stitch (the one you just purled); purl another stitch and repeat the process of pulling the far-right stitch over the next stitch. Voila!

      Reply
      • Erika says

        December 23, 2014 at 11:16 am

        Thanks! It worked out beautifully! I just knitted my first cowl! 🙂

        Reply
        • Erika says

          December 23, 2014 at 11:17 am

          woah… I didn’t mean for the pic to be so big… sorry! lol

          Reply
          • Davina says

            January 9, 2015 at 9:34 pm

            It looks fantastic and so cozy! Bravo!!!

            Reply
  14. Cyn says

    December 5, 2014 at 3:08 pm

    I love your videos. Really easy to follow. I would like to make the big hat for my six-year old daughter. How many stitches and rows would I use?

    Thanks.

    Reply
  15. Genesis says

    December 9, 2014 at 1:52 am

    Hi, Davina..is my first time here I love the way you explain step by step..my native language is Spanish and I understand very well everything explained by you..I will buy my stuff to start making the big red hat,and after that I will make a Cushy Cowl ..I think my daughter will love it. last year I was diagnosed with breast cancer and after my surgery I start making hats for the kids with cancer was my really work ..but I really like to learn more about knitting, please feel free to send me any site where I can found more about your job. Thank you and God Bless you.

    Reply
    • Davina says

      December 9, 2014 at 4:08 am

      Hey Genesis! First, what a pretty name! Second, I’m glad you can understand the videos. I’m glad that you’ve turned knitting into something that can help kids with cancer. That’s a truly wonderful way to spend your time! I wonder if they would enjoy knitting as well, as a way to relax their bodies and minds. Knitting is very therapeutic and has a lot of other unexpected health benefits: https://sheepandstitch.com/6-unexpected-benefits-of-knitting/

      Reply
  16. reeb says

    December 17, 2014 at 2:28 pm

    What are the circular needles you used for the cushy cowl? they look beautiful and comfortable i just wish i could get my hands on em! can’t see anything similar anywhere!

    Reply
    • Davina says

      December 22, 2014 at 12:51 am

      Hey Reeb,

      If I remember correctly, they’re from Lantern Moon. Not a cheap needle, but really beautiful with a good weight to it.

      Reply
  17. Ann says

    December 24, 2014 at 1:35 pm

    i’m using 40″ needles and i’ve finished the first few rows but there is a big “gap” between my first and last cast on stitches (basically when i’m done each round, there is a small 2-3 inch portion of yarn joining my needles). should I start over, or will that gap get smaller as i keep going? thanks! 

    Reply
    • Davina says

      January 9, 2015 at 9:34 pm

      Hey Ann! Sorry for the late reply. You’re right. The gap will close as you continue knitting. When you’re done your cowl, you can tighten up that gap by weaving in that loose strand of yarn leftover from you cast on. Hope that helps!

      Reply
  18. Isla says

    January 19, 2015 at 9:17 am

    Hi Davina,

    I love your video! However, I can’t seem to download the pattern. I have tried several times and it won’t completely download. Is there any way that you could email it to me?

    Best,
    Isla

    Reply
    • Davina says

      January 22, 2015 at 12:38 am

      Hey Isla,

      That’s odd that it won’t download completely. Usually the problems are related to viewing the PDF rather than downloading it. Either way, do email me at davina@sheepandstitch.com and I’ll email you the pattern.

      Reply
      • Isla says

        January 28, 2015 at 1:42 pm

        Thanks! I just saw your comment. It turned out that I was able to download it in my Safari browser but not the Chrome one. Not sure why but I’m almost finished with the cowl. Great pattern!

        Reply
  19. Maggie says

    January 20, 2015 at 1:56 am

    Hi Davina! Your videos are such a pleasure to watch, they make me super excited to start a knitting project. I actually just learned the knitting basics over the holidays from my bf’s mom and now want to get started on a cowl scarf on my own. I’m about to buy the round knitting needle and the flat noodle (I don’t own any at the moment). If I’m using the US17 in the round, does the flat needle also have to be the same size? Hope the question isn’t too silly, I’m a complete novice! Thanks for your help!

    Reply
    • Davina says

      January 21, 2015 at 9:06 pm

      Hey Maggie! Glad to hear you’ve caught the knitting bug! It’s a hard one to shake, and sometimes it sticks around for life (which is not such a bad thing!)

      Anyway, for this pattern you don’t need a set of flat needles. You only need a pair of circular needles to knit it up. So if you get some bulky yarn and a pair of US 17 circular needles (I love that you accidentally called them “noodles”!) you’ve got everything you need for this pattern. So, if you purchase a set of flat needles, feel free to get any size you need.

      Reply
  20. LauraV says

    January 22, 2015 at 4:56 am

    Hello, thanks for the videos, I just finished my first knitting project that was made using your tutorial. I did the garter stitch cowl but I didn’t do it with circular needles. I was just wondering, mine came out a little stiff, the resulting fabric hasn’t got a drapey feeling. What did I do wrong? Did I knit too tight?

    Reply
    • Davina says

      February 24, 2015 at 3:57 am

      Hey Laura,

      This has something to do with knitting tension. It could be that your yarn is too thick for your needles or vice versa. It could also be that you’re knitting very tightly.

      However, how you knit shouldn’t be a huge factor unless you’ve got a death grip. My guess is that your yarn might have been very thick and your needles too thin. This is usually why fabric is tight. If you bump up your needles by one or two sizes, your fabric should loosen up a lot.

      Oh! Another reason could be the fibre of your yarn. Certain types of wool are more stiff than others depending on the breed of sheep (I won’t go full fiber geek on you here). Merino is very soft and drapey. Alpaca is especially drapey and will give beautiful slouch even if its tension is tight. Other types of wool like Shetland will stiffen up like a board when knit tightly. Acrylic is typically quite drapey because it’s heavy.

      But the main culprit is probably the knitting tension. Even the stiffest yarn will drape if the tension is loose enough (think: lace). So, my guess is that your needles were too small for the yarn that you were using.

      Reply
  21. Isla says

    January 28, 2015 at 1:46 pm

    One more question: You recommend a loose bind off. Would Jenny’s stretchy bind off be too loose or is that OK to use with this cowl?

    Reply
    • Davina says

      February 24, 2015 at 4:00 am

      Hey Isla,

      Sure! You can try JSSBO (here for those of you who are interested: https://www.knitty.com/ISSUEfall09/FEATjssbo.php) if you tend to knit and cast off tightly. I was able to cast off normally without the edge being too tight.

      You can try using JSSBO for a dozen or so cast off stitches, look at the edge and decide if it looks okay. If so, then keep on going! If it looks too loose and splayed, then revert back to the regular cast off.

      Reply
  22. Zahra says

    March 2, 2015 at 9:12 pm

    I didnt check the stitches to make sure they werent twisted, and it ended up twisted. Im still knitting it, so is there a way to fix it ehile kntting or after knitting ir not at all? Thsi is actually my second cowl and surprisingly my first one turned out perfect, but i guess i was overconfident and it messed up. If there is a way to fix this, i would reslly appreciate 🙂 thank you for your awesome tutorials. You make them better than anyone:) 😉

    Reply
    • Davina says

      September 23, 2015 at 2:08 am

      Hey Zahra,

      Unfortunately, once the stitches are twisted, they will remain twisted. There’s no easy fix for this other than ripping out your work and casting on again. The trick is making sure that your stitches are untwisted before you join in the round. However, for a cowl of this length, a twist won’t be *that* noticeable. If anyone asks, you can tell them that you did it on purpose! Call it mobius strip, which is actually a thing: https://en.wikipedia.org/wiki/M%C3%B6bius_strip

      Reply
  23. karen la fave says

    September 14, 2015 at 10:35 pm

    How long is this scarf? I want it to wrap around the neck several times.. its hard to tell by the pictures.

    Reply
  24. karen la fave says

    September 14, 2015 at 10:37 pm

    Also, do you have any reccomendation on how to make it in two colors?

    Reply
    • Davina says

      September 23, 2015 at 2:11 am

      Hey Karen,

      If you get gauge, the cowl will be 50″.

      For a two color cowl, you can cast on with one color and knit until you’re ready to switch colors. Then leave a strand of about 10″ of the first color and cut the yarn. Join the new color by wrapping the yarn around the needle, leaving a tail of 10″ and start knitting with that new color. When you’re finished, weave in the ends of the two yarn strands where you joined a new color. Hope that makes sense!

      Reply
      • karen la fave says

        September 23, 2015 at 7:07 pm

        Thanks for answering. Not sure what the gage is…the printing was all fuzzy when I downloaded and tried to print the pattern.

        Reply
        • Davina says

          September 23, 2015 at 9:51 pm

          Hi Karen, are you able to view the pattern clearly on your computer? The gauge is 8sts = 4″ in garter stitch. Check out this post on gauge if the concept is new to you: https://sheepandstitch.com/what-is-knitting-gauge/

          Reply
  25. Georgina says

    October 19, 2015 at 9:56 am

    Hello!

    I wanted to ask what length your circular needles were? I’ve bought yarn that requires 8mm needles but I know nothing about the length. Please help!

    Reply
    • Davina says

      October 19, 2015 at 9:59 am

      Hey Georgina! A circular needle that’s between 32-40″ is a good size.

      Reply
  26. Ina says

    October 25, 2015 at 8:35 pm

    Hi. Thanks for the video. Quick question. The color that yo name for the yarn is pearl ten but when I look to buy it it looks more beige in the picture. Can you tell me where to purchase I
    The yarn and if that is the name of the color?

    Reply
    • Davina says

      October 25, 2015 at 9:53 pm

      Hey Ina, The color is indeed Pearl Ten. I just did a quick search and it shows that Fabulous Yarns has it in stock here: https://www.fabulousyarn.com/malabrigo_rasta_069pearlten.shtml When I look at the photo for the color, it looks about right! It doesn’t show the purple shading, but that could just be the lighting of the yarn.

      Reply
  27. Meha says

    October 26, 2015 at 9:25 am

    Hello Davina!

    I started my cushy cowl pattern today and as I finished purling my second row, I realised there was a big float of yarns between the needles. I tried pulling my tail yarn to see if it gets fixed but I think I opened a stitch in the process. Attaching a pic here, do you think that’s what happened? What should I do to fix this? Starting over is not an issue, if you think that’s the best solution. Do let me know!

    Just a heads up, I am using two colour threads together on a 12mm needle set.

    Thank you 🙂
    Meha

    Reply
    • Davina says

      October 26, 2015 at 11:21 am

      Hey Meha!

      A gap is pretty normal after the first round of circular knitting. However, you can control how big it is. To avoid a big gap, when you join your yarn in the round, give the first stitch a good tug to ensure less slack between the stitches. To totally close the gap, once you’ve finished your project, you can weave the tail from your longtail cast on through the gap to close it up neatly. Hope this helps!

      Reply
      • Meha says

        October 26, 2015 at 5:43 pm

        Thank you!

        Reply
  28. Lauren says

    October 30, 2015 at 4:19 pm

    I finished my cowl! I’m a little bit sad that I didn’t seem to knit it loosely enough… I used Malabrigo rasta but it came out smaller than I thought. That said, I’ve had plenty of compliments on it since I’ve worn it and I love this yarn. Thanks for the tutorial!

    Reply
    • Lauren says

      October 30, 2015 at 4:20 pm

      Oops that image is pretty massive sorry :S!

      Reply
    • Davina says

      October 30, 2015 at 11:28 pm

      It looks awesome! Great job!! If you find that the cowl is a bit too tight, you can lightly block it. This means that you can dunk it in some room temperature water, let it soak for about 10 minutes, and then squeeze out the water (don’t wring it out or it might felt!), and lay it out to dry on some towels. When you lay it out to dry, you can stretch the cowl to the size that you like. Then, when it dries, it will dry in that shape! It’s pretty great. Here’s a short tutorial on how to block a sweater, but the same principles apply to the cowl: https://youtu.be/7dL0wggBy7I

      One request: I’m trying to highlight knitter’s projects on the Facebook page so that other would-be knitters can see that knitting is not scary and totally possible! If you feel comfortable, it would be awesome if you can post your finished cowl to the Sheep & Stitch FB page here so that everyone can see how awesome it turned out!: https://www.facebook.com/sheepandstitch

      Reply
      • Lauren says

        October 31, 2015 at 7:51 am

        Ah great, I’ll give it a try. And sure I’ll post it! Thanks again.

        Reply
  29. Sandra Alvarez says

    January 2, 2016 at 10:13 am

    Hi Davina, I screwed up somewhere, when I went into the purl row, I was ruling and it was no longer connected 🙁 I’m left handed so this is duly hard for me. Any idea what I did wrong? Thank you – the videos a re really helpful. I know how to knit and purl but I think it’s my left handed kitting that is messing me up 🙁

    Reply
    • Davina says

      January 3, 2016 at 6:21 pm

      Hey Sandra! Sorry to hear that! I know knitting can be tough for lefties. Can you explain what you mean by, “I was ruling and it was no longer connected”? Do you meant that the stitches weren’t connected in the round? Did they slip off the needle when you were just starting to join?

      Reply
  30. Anna says

    January 30, 2016 at 9:32 am

    A great video. You explained everything so well which made it easy to follow. You are a good instructor. Thanks.

    Reply
  31. Sara says

    February 26, 2016 at 8:25 pm

    I was only able to find size 15, 36″ circular needle. I cast on the 100 stiches and they don’t even cover all the wire. Should I cast on more?

    Reply
    • Davina says

      March 5, 2016 at 7:38 pm

      Hey Sara,

      A lot of the times, the cast on stitches can bunch up on the needle. You can try stretching them out so that they spread out onto your needle. Use your hand to grab hold of a bunch of the cast on stitches and gently pull them away from you so that the stitches spread. Do this across your whole cast on row and see how much you can get the cast on stitches to spread. If the stitches are still not covering the whole needle, then you can consider casting on more stitches. This will make your cowl wider though, so do keep that in mind. Hope this helps!

      Reply
  32. Michele says

    February 28, 2016 at 4:34 pm

    Hi Davina! One issue I’ve run into is that the circular needles I bought are only 29 inches in length (from needle tip to needle tip) instead of the 32 inches that is stipulated in the directions. I was wondering if this might cause me problems while attempting to knit this cowl.

    Reply
    • Davina says

      March 5, 2016 at 7:28 pm

      Hey Michele, the 29″ is perfect! The yarn may bunch up a bit while on the needles, but you’ll be able to knit the cowl.

      Reply
  33. cristal says

    March 2, 2016 at 9:38 pm

    how many skins?

    Reply
    • Davina says

      March 5, 2016 at 7:09 pm

      I used two skeins of Malabrigo Rasta to make this cowl. The exact yardage is listed in the PDF pattern which you can download for free here: https://sheepandstitch.com/shop/cushy-cowl-knitting-pattern/

      Reply
  34. Carol says

    April 14, 2016 at 2:10 pm

    I am a total newbie…….saw your utube video AND FELL IN LOVE WITH THAT COWL.
    Searched you out and found your web site. Great site. Thank you.
    Right now I’m knitting my first project, practice knitting, but my next project is definitely
    that wonderful cowl. I’ll be returning time and time again.
    Many thanks, Carol from Chicago

    Reply
  35. Jo says

    August 3, 2016 at 11:20 pm

    Hello
    Do you have any tips on how to alter this for a 5 year old?

    Thank you

    Reply
    • Davina says

      August 12, 2016 at 7:23 pm

      Hey Jo! You can check out this video on “How to knit a seed stitch cowl with any yarn”: https://youtu.be/J64WrUkaU0o At the 16:06 mark, I go through how to customise the exact circumference of a cowl. You can use this same method to customise the circumference for the cushy cowl. It involves deciding how large you’d like the cowl to be, knitting a small swatch to determine how many stitches make up an inch and then multiplying that number by the number of inches you want your cowl to be. Hope that helps!

      Reply
  36. Kirrily says

    October 20, 2016 at 10:05 pm

    I seem to pick up a stitch every time I do a purl row!
    In the tutorial it said to wrap around the needle before moving the stitch marker, but then that wrapped around bit ends up becoming a stitch. I’m not sure how to fix this 🙁

    Reply
    • Davina says

      October 20, 2016 at 10:15 pm

      Hi! It’s been awhile since I’ve re-watched this tutorial, but I don’t remember saying that you should wrap your working yarn around the needle before moving the stitch marker over. This is called a “yarn over” and will definitely create a new stitch, which we don’t want!

      Since this is happening on a purl row, I think what I meant to say is to bring your yarn up front, because the next stitch is going to be a purl stitch, which requires your yarn being up front and not in the back. So, you’re not wrapping the working yarn around your needle and then purling. You’re just bringing your yarn up front in preparation for that new purl round. Does that make sense? Sorry for the confusion!

      Reply
  37. Andrew Zuidema says

    November 7, 2016 at 10:01 am

    Dear Davina

    I had a question on the knitting patterns for the cowl and big hat. I come from the Netherlands, and getting the needle size and yarn size you show can be difficult to achieve. I was therefore wondering about how many more cast on stitches, if at all, I should add.

    Needle size: 9mm
    Yarn: 10×15 is 7. it recommends needle sizes 6.5-7 (USA 10).

    For the big hat I was wondering if I should increase the base to 56 cast on stitches. In the end I would have 7 stitches after decrease. Or if its better to leave it as you show?

    For the Cushy Cowl if i should increase the base stitches from the given 100 stitches. I was thinking maybe 20 extra?

    Reply
  38. Cindi says

    December 30, 2016 at 5:43 am

    I just finished the cowl and not sure where I went wrong! The scarf turned out okay but not as long (39 in.). I cast on the 100 stitches, used circular needles US 11, and super bulky yarn. I am a new knitter, and love it! Your site has helped me sooooo much. But obviously I’m missing something. Help!

    Reply
    • Davina says

      January 4, 2017 at 2:35 am

      Hey Cindi! Congrats on completing the cowl! To get the exact same measurements as the cowl in the pattern, you’ll need to have the same knitting gauge as what the pattern calls for. That would be 8sts=4″/10cm in garter stitch.

      So if you’re able to knit a square of fabric with your yarn and needles in garter stitch, and have 8 stitches measure out to 4″ or 10cm, then you’ve got the same knitting gauge as the pattern, and your cowl will come out to the same measurements. Here’s more on knitting gauge: https://sheepandstitch.com/what-is-knitting-gauge/ However, checking the knitting gauge happens *before* you start knitting.

      Since you’ve already finished your cowl, what you can do is block it so that it stretches out and becomes longer. Blocking entails soaking your finished cowl in lukewarm water, for about 5-10 minutes, and then pushing the water out (not wringing it, never wringing it!), and then laying it out to dry.

      When your knitting is wet, you can stretch it, pull it, and basically widen or lengthen it as you see fit. Once you’ve pushed and pulled your cowl to the length you like, use sewing pins or safety pins to pin your cowl in place. Your wet knitting will dry in that shape. It’s pretty cool, and a real lifesaver if your knitting turns out a bit small. Here’s a video on blocking a sweater: https://youtu.be/7dL0wggBy7I The same principles apply to blocking a cowl. Hope that helps!

      Reply
  39. Prarthi says

    January 15, 2017 at 4:18 am

    Hi. can i do this with simple wooden needles?

    Reply
    • Davina says

      January 15, 2017 at 10:47 pm

      Hi Prarthi,

      Do you mean two straight needles as opposed to the circular needles? For this pattern, you really do need a circular needle (the big long one with a flexible cord). It’ll be pretty impossible to knit the cowl on two regular straight needles.

      However, you could knit a similar cowl with straight needles by casting on a number of stitches (depending on your yarn weight and the width that you like) and then knitting a long scarf. Once you cast off, you can sew the two ends of your scarf together into a loop, thereby making a cowl. Hope that helps!

      Reply
  40. Alison Mader says

    February 14, 2017 at 6:14 pm

    Hi! I have started with a medium weight yarn and 6.5mm, 29in circular needles with 111 cast on stitched for a 6in. wide cowl scarf. However, my stitches are stretched out so far over the needles and should not stretch any further I don’t think. I only want a 6in. wide cowl. Are my calculations wrong? should I just use straight needles and sew it together?

    Thanks so much! Alison

    Reply
  41. Evie says

    September 6, 2017 at 8:12 pm

    There are some folks that are born teachers!! You are one of them!! Simplicity with clarity equals genius!! Thank you. I hope you post a how to cowl fair isle type. I want to learn how to knit that stitch. Thank you.

    Reply
  42. Cameron says

    October 30, 2019 at 9:15 am

    If I wanted to to make this for a 10 year old, what would change? BTW I love your website and videos, used them to teach myself how to knit! Thank you

    Reply
    • Davina says

      November 3, 2019 at 10:34 pm

      You can shorten the length to make it shorter.

      Reply
  43. Paula says

    January 17, 2021 at 5:09 am

    Very nice instructions! Love making it, turned out to be a little small in order for me to double up to make a better looking cowl that shows in the picture.
    thank you

    Reply
  44. Paula says

    January 17, 2021 at 5:24 am

    Would like to revise my comment, I just learned from another great video that I can block the scarf in order to extend the length. Love how it all turned out.

    Reply
  45. ACW says

    May 12, 2021 at 12:35 pm

    hey when I try to knit as so as I get started it gets to tight to work with before I can troubleshoot I get interrupted

    Reply
  46. Maria Powell X says

    September 24, 2021 at 3:12 pm

    Hello
    I love how detailed your instructions are, but the music is so loud and overpowering it really competes for my attention. Please consider having no music.

    Reply
  47. Belinda says

    October 8, 2021 at 1:30 pm

    Can I make this only using one skein. I made it prior with both and love it but I was wanting one without that much bulk as I live in the south. So thought I would just use one skein. Would that work and if so would I cast on just 50 or cast on 100 stitches? Thanks much,

    Reply
  48. Sorin says

    December 28, 2021 at 10:32 am

    Hey Davina,

    thank you for the awesome videos, I got into knitting because of your videos and love how you explain all the techniques.
    Cheers!

    Reply
  49. phoenix says

    January 7, 2022 at 9:56 am

    Hi Davina.
    I live in Brazil and I love to knit. I speak english but I never learned to knit in english, so I looked at the projects and felt frustrated not being able to do them.
    Until I found your videos.
    I made a glossary following your classes, so now I understand the patterns and can follow the projects.
    Thank you so much for your patient lessons. You explain so well it´s easy for me to understand, and learn.
    A big kiss from Brazil
    phoenix

    Reply
  50. Collin says

    February 22, 2022 at 2:59 pm

    Hi Divina! I’m a brand new knitter and your videos have been extremely helpful in figuring things out. I was about to try this, but I had a question about casting on. Is there a difference between this method of long-tail cast on, and the method of long-tail cast on that you show in your beginning of your “How-to-knit” tutorial? I think you’ve referred to that as the “thumb style” before.

    Thanks for your insights and your wonderful videos 🙂

    Reply
    • Davina says

      March 17, 2022 at 10:53 pm

      The method is different, but the result is the same! Both cast ons would work.

      Reply
  51. Aripra says

    April 1, 2022 at 12:31 am

    I always make thecloops in different way and tight, your website is also really good.

    Reply
  52. Sandy says

    June 3, 2022 at 6:57 pm

    I am a beginner and absolutely love your videos! Thank you for making the steps so easy to follow! Your videos taught me to Purl, join yarn and do the long tail cast on. I was excited to use all for the cushy cowl and it was SO much fun! The Malibrigo yarn was divine and the instructional video was perfect! I used almost the full two skeins. I want to buy this yarn again in another color and make something else. Thank you for helping me become a real knitter!

    Reply

Leave a Comment Cancel reply

Your email address will not be published. Required fields are marked *

Primary Sidebar

Most Popular

  • 3 beginner knitting mistakes 3 Beginner Knitting Mistakes and How to Fix Them
  • how to knit a scarf for beginners How to Knit a Scarf for Beginners
  • egyptian knitting The History of Knitting Pt 1: Mysterious Origins

Categories

Footer

Navigate

  • About
  • How To Knit
  • Patterns
  • Blog

Support

  • Privacy and Affiliate Disclosure
  • Technical Support
  • FAQ
  • Contact
  • Advertise

Instagram

Follow Us On Instagram

Pom pom pens make great last-minute gifts! If you’ve got scrap yarn and a glue gun, you can make these pens! They turn writing into a fun and playfulness exercise ✨ I’m gifting these pens to my nieces this holiday season. I think they’ll love it!  For more last-minute knit and yarn-related gift ideas check out the link in my profile!  #lastminutegifts #furrypen #diyfurrypen #diyfuzzypen #pompom #pompoms #knitgifts #knittedgifts #giftsfortweens #giftsforteens #knitting #yarn #yarnlove #yarnlovers #knitgift #giftideas #giftidea
This double stockinette stitch headband is super c This double stockinette stitch headband is super cosy and easy to knit!  🤓 Instructions:  Cast on an even number of stitches. (I cast on 36 sts for mine. Cast on more or less depending on the yarn you use and the width you’d like).  Row 1: *k1, slip 1 with yarn in front, then bring yarn to the back; repeat from * to end of row  Repeat Row 1 until headband fits around your head snugly.  Cast off in pattern  Seam together as shown in the video.  Weave in ends and wear with confidence!  To watch the full pattern tutorial, head to my YouTube channel and search for “Twisted Headbands” or go to this link: https://bit.ly/3DLiMWc  Yarn: @malabrigoyarn silky merino in color Mares 196
Needles: 4mm needles
Supplies from @lovecraftscom 
#knittingpattern #knitting #knitstagram #knittersgonnaknit #knitknitknit #freeknittingpattern #beginnerknitter
Let’s make a bobble! 🫧 In this demo I’m m Let’s make a bobble! 🫧  In this demo I’m making a 5-stitch bobble. But you can make a bobble of any size! Just knit into the stitch more or less times to make the bobble bigger or smaller.  🤓 Instructions:  Knit into front and back, front and back, and front of the stitch. 5 sts made.  Turn work to wrong side. Purl the 5 sts.  Turn work to right side. Sl2 sts knitwise, K1, pass 2 slipped sts over first stitch. Sl1 knitwise, K1, pass last 2 sts over remaining stitch. 1 stitch remains  To watch a detailed bobble demo, watch the baby bobble blanket tutorial in the link in the description. Happy knitting!  #bobble #bobbleknitting #knittersgonnaknit #knittinginspiration #knittingtutorial #bobblestitch #bobbles #showtimeknit #knittersofinstagram
The Baby Bobble Blanket is as fun to knit as it is The Baby Bobble Blanket is as fun to knit as it is to snuggle into ☺️  Sized for babies, but easily customisable for kids and adults 👶 👧 👵  Grab the free pattern in the profile link or at sheepandstitch.com  #knittingpattern #knittersgonnaknit #babyknits #babyknitting #babyknit #babyblanket #knittingtherapy #knitstagram
⭐️ New Pattern ⭐️ The Baby Bobble Blanket ⭐️ New Pattern ⭐️ The Baby Bobble Blanket is a beginner-friendly pattern for the tiny tot in your life!  Studded with big bobbles, it’s a delight to hold, snuggle and fall asleep with 😴  This pattern is sized for babies, but easily customisable for kids and adults. Grab the #freepattern and video tutorial in the profile link or at sheepandstitch.com  Yarn: 8 balls of Debbie Bliss Cashmerino Aran in Baby Pink from @lovecraftscom  #knitting #knittingpattern #knitstagram #babyblanket #babyknits #fallknits #knittersgonnaknit #knitknitknit #knitaddict #knittersofinstagram #knitting_inspiration #handknit #handknits #babyknitting #babyknittingpatterns #bobblestitch #knitblanket
The Market Bag is so cute, practical and eco-frien The Market Bag is so cute, practical and eco-friendly 🍃 It’s a unique knit that’s perfect for all your grocery-toting needs!  I loved knitting this lacy dude. It’s so fun and satisfying, and it comes together very quickly because of the expansive lace 🕸  Grab the #freepattern and video tutorial in the link in the profile!  #knitting #marketbag #knitbag #knit #knittersgonnaknit #knitstagram #knitting #knitting_inspiration #knittinginspiration #knittingpattern #knittingpatterns

Search The Site

Stay in Touch

  • Facebook
  • YouTube
  • Instagram
  • Pinterest

2023 Copyright © Sheep and Stitch Limited

Pin
Share
Tweet