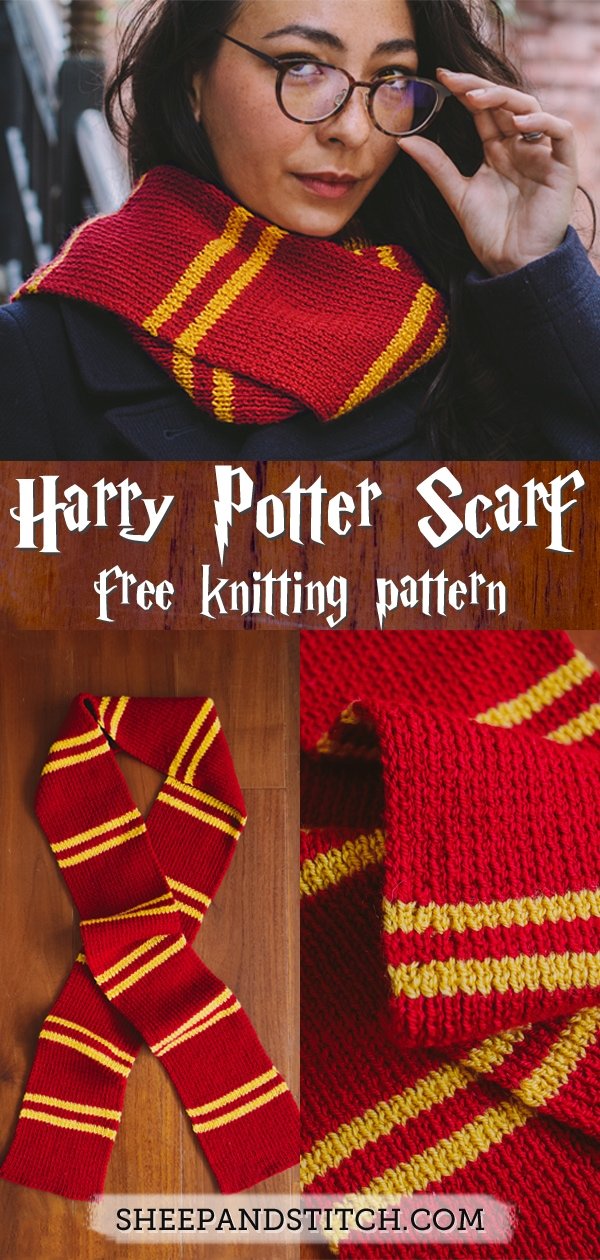
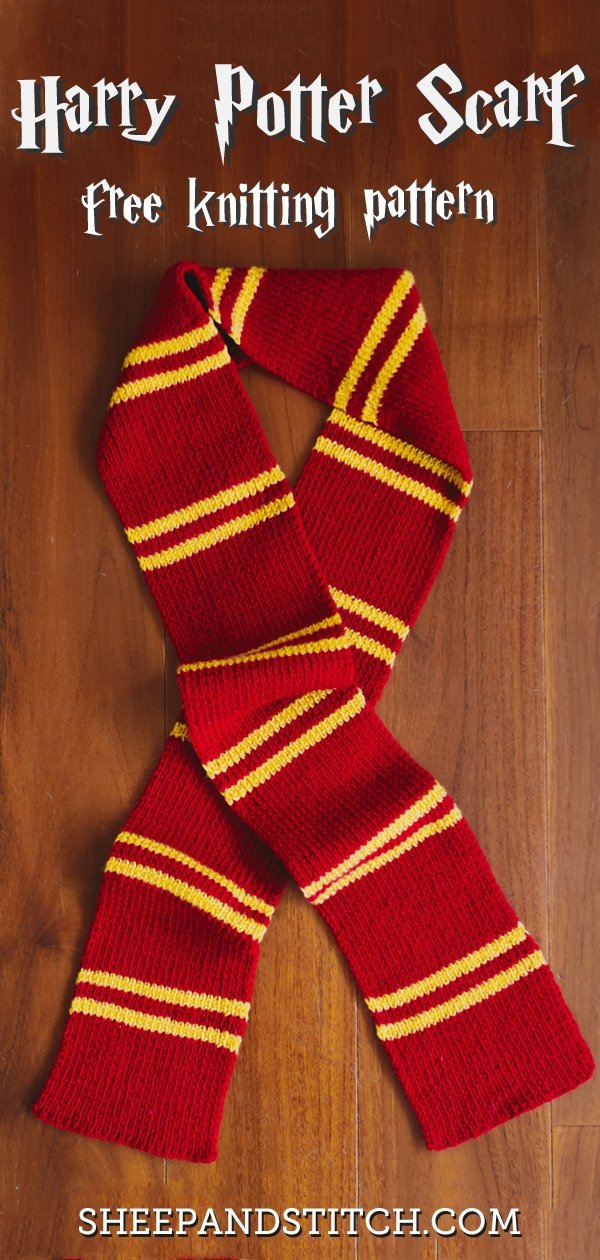
Harry Potter Scarf Knitting Pattern (Tutorial for muggles)
May contain affiliate links (what's this?)There’s something wonderfully preppy and fantastical about a Harry Potter Scarf, or more accurately, a Hogwarts House Scarf.
Knit in 1×1 rib with affordable acrylic yarn, this scarf is great for beginner knitters looking for a new challenge beyond garter stitch.
With a slipped selvedge edge and a slightly narrow width, this Hogwarts scarf is sleek and modern. Make it a part of your everyday wardrobe or use it as the finishing touch in your Hogwarts cosplay.
Buy the PDF Pattern
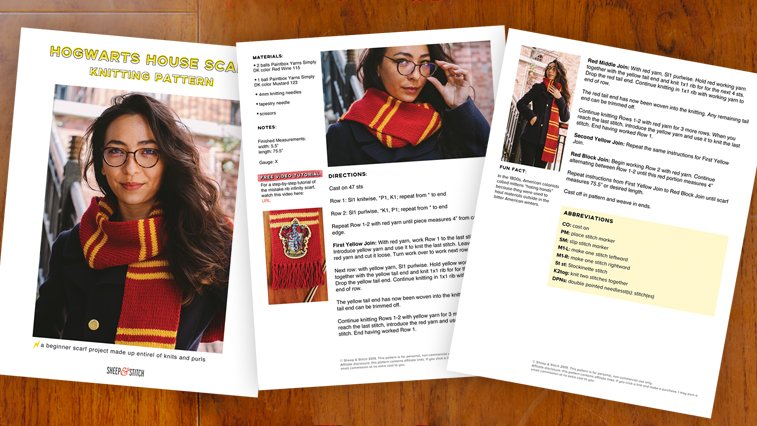

For the price of a butterbeer at the Hog’s Head, you can support Sheep & Stitch by purchasing a PDF file of this pattern. This 3-page PDF file is beautifully laid out and ready to be printed!
To purchase, click the button above or visit the shop. Upon purchase, the pattern PDF file will be delivered to you by email. Thank you for your support!
Hogwarts House Colours
Hogwarts scarf colors correspond to one of the four Hogwarts houses. Below, a brief summary of the four noble houses.
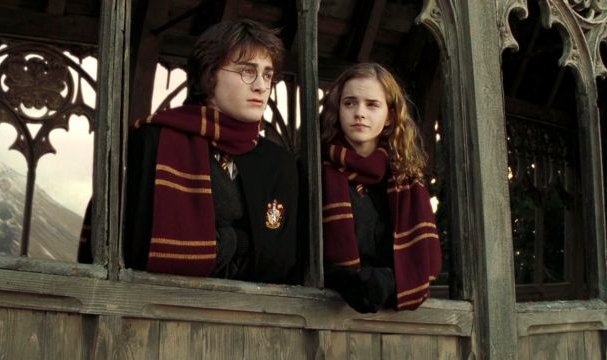
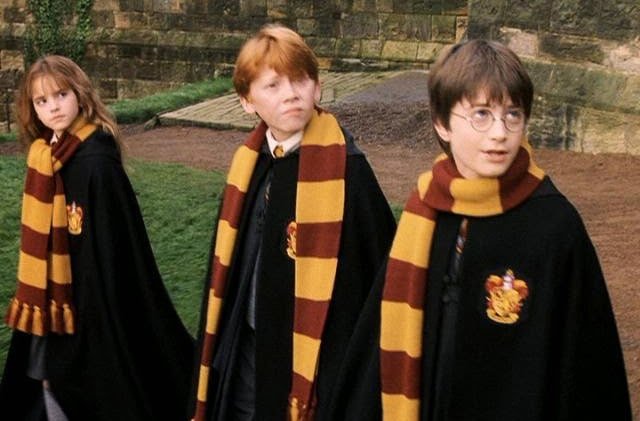
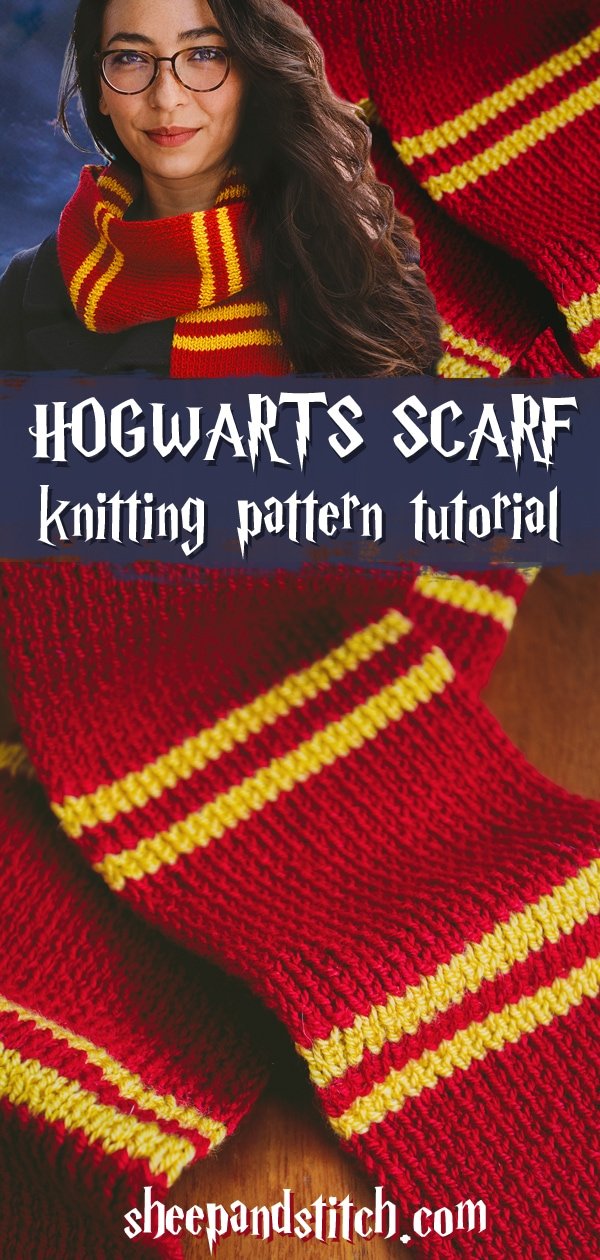
Gryffindor: founded by Godric Gryffindor, Gryffindors value  bravery, daring, nerve and chivalry. The house corresponds to the element of fire, and its emblem is a lion. Gryffindor house colors are scarlet and gold.
 Ravenclaw: founded by Rowena Ravenclaw, Ravenclaws are intelligent, knowledgeable and witty. The house corresponds to the element of air, and its emblem is an eagle. Ravenclaw house colors are blue and bronze.
 Hufflepuff: Hufflepuff: Founded by Helga Hufflepuff, Hufflepuffs are hard working, dedicated, loyal and fair. The house corresponds to the element of earth, and its emblem is a badger. Hufflepuff house colors are yellow and black.
 Slytherin: Founded by Salazar Slytherin, Slytherins are ambitious, cunning and resourceful. The house corresponds to the element of water, and its emblem is a snake. Slytherin house colors are emerald green and silver.
For those wanting to be sorted into a Hogwarts House, the Pottermore website (run by J.K. Rowling herself!) has a wonderful Sorting Hat Quiz that will have you sorted into a House in two shakes of a newt’s tail! (Note that you’ll need to sign up for a free account first).
All house information is from Harry Potter Wiki
A Note about this Hogwarts Scarf Pattern:
According to fan forums, the stripe pattern consisting of a large block of color followed by two smaller stripes is reserved for older students in their third or fourth years.
First and second year students wear scarves with large blocks of color.
In this pattern tutorial, we’ll go through the third and fourth year scarf style, with two smaller bands of color.
Who Should Knit a Hogwarts Scarf?
If you’re comfortable casting on, knitting, purling and casting off, then you’re ready to knit this scarf!
If you need a bit more practice, check out the How to Knit: Ultimate Beginner’s Guide to get a handle on the basic steps of knitting.
In the video tutorial below, you’ll learn how to:
- slip a selvedge edge
- join new yarn into knitting
- weave in ends as you knit
- weave in remaining ends
- make a fringe (optional)
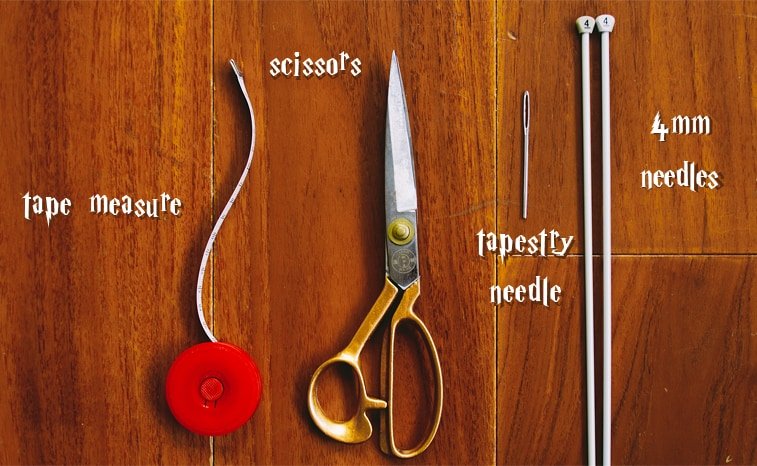
Materials and Notes
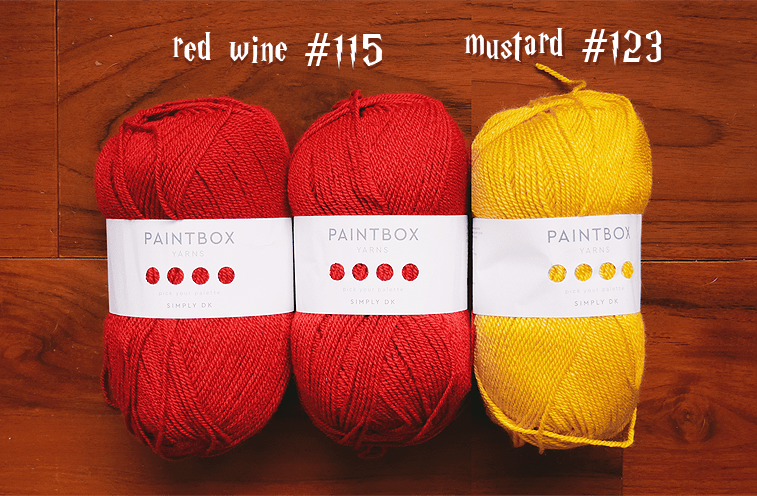
The yarn that I’ve chosen is Paintbox Yarns Simply DK. It’s an affordable acrylic yarn that’s soft and easy to work with.
Best of all, a ball costs less than $3 USD, putting the yarn costs for this scarf at under $10!
Yarns Used:
- 2 balls of Paintbox Yarns Simply DK in color Red Wine 115 (100% acrylic)
- 1 ball of Paintbox Yarns Simply DK in color Mustard 123 (100% acrylic)
Other Similar Yarns for Gryffindor:
- Patons Fab DK in color Cherry or Burgundy and Canary (100% acrylic)
- Stylecraft Special DK in color Lipstick or Claret and Mustard or Sunshine (100% acrylic)
- Plymouth Yarn Encore Worsted in color Stitch Raven or Christmas Red and Golden Glow (75% acrylic/25% wool)
Yarns for Other Hogwarts Houses:
-
- Slytherin: 2 balls of Paintbox Yarns Simply DK in color Grass Green or Racing Green and 1 ball in Slate Grey (100% acrylic)
- Hufflepuff: 2 balls of Paintbox Yarns Simply DK in color Mustard Yellow and 1 ball in Pure Black (100% acrylic)
- Ravenclaw: 2 balls of Paintbox Yarns Simply DK in color Midnight Blue or Royal Blue and 1 ball in Slate Grey (100% acrylic)
Recommended Needles: 1 pair of 4mm straight knitting needles (aluminium)
Finished Measurements: width is 5.5″ and length is 75.5″
Notions:
Pattern Notes:
Custom Width: You can make this Hogwarts scarf as thin or as wide as you like. Just cast on an odd number of stitches and follow the pattern as written.
Scarf Width: After casting on and knitting for one or two rows, you might notice that this scarf is quite wide. Don’t fret. The scarf will narrow after a few more rows of knitting.
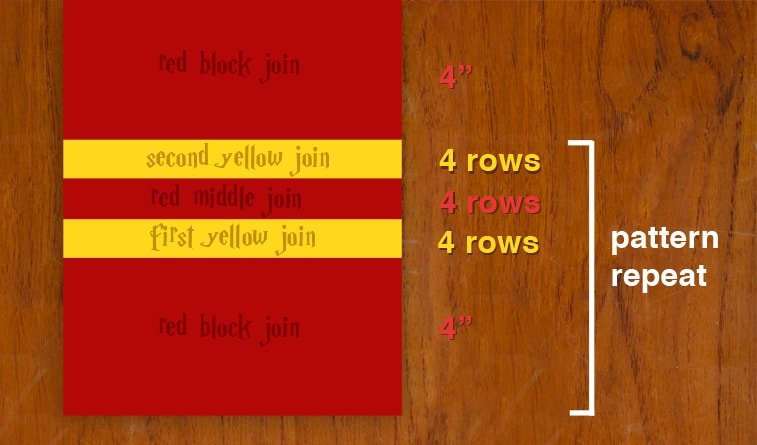
Pattern Repeat: This scarf follows a simple color pattern consisting of 4 inches of red, 4 rows of yellow, 4 rows of red, and 4 rows of yellow. This pattern is repeated until the scarf is the length that you like.
1×1 Rib: the scarf is knit in 1×1 rib with a slipped selvedge. If you need a bit more instruction on 1×1 rib, check out this tutorial on rib knitting, which includes a video tutorial and some handy tips.
1×1 Rib on Straight Needles:
Row 1: *knit 1, purl 1; repeat from * to the end of the row
Row 2 and all other rows: knit the knit stitches and purl the purl stitches
Harry Potter Scarf Video Tutorial

For step-by-step instructions on how to knit this Harry Potter scarf, watch the video tutorial above.
It includes a walkthrough of how to attach an optional fringe!
Knitting Instructions
With red yarn, CO 47 sts
Row 1: Sl1 knitwise, *P1, K1; repeat from * to end
Row 2: Sl1 purlwise, *K1, P1; repeat from * to end
Repeat Rows 1-2 with red yarn until piece measures 4” from cast on edge.
First Yellow Join:
With red yarn, work Row 1 to the last stitch. Introduce yellow yarn and use it to knit the last stitch. Leave a 6” tail on red yarn and cut it loose. Turn work over to knit next row.
Next row: with yellow yarn, Sl1 purlwise. Hold yellow working yarn together with the yellow tail end and knit in 1×1 rib for for the next 4 sts. Drop the yellow tail end. Continue knitting in 1×1 rib with working yarn to end of row.
The yellow tail end has now been woven into the knitting. Any remaining tail end can be trimmed off or woven into the knitting.
Continue knitting Rows 1-2 with yellow yarn for 3 more rows. When you reach the last stitch, introduce the red yarn and use it to knit the last stitch. End having worked Row 1.
Red Middle Join:
With red yarn, Sl1 purlwise. Hold red working yarn together with red tail end and knit in 1×1 rib for for the next 4 sts. Drop the red tail end. Continue knitting in 1×1 rib with working yarn to end of row.
The red tail end has now been woven into the knitting. Any remaining tail end can be trimmed off or woven into the knitting.
Continue knitting Rows 1-2 with red yarn for 3 more rows. When you reach the last stitch, introduce the yellow yarn and use it to knit the last stitch. End having worked Row 1.
Second Yellow Join:
Introduce the yellow yarn and follow instructions for First Yellow Join.
Red Block Join:
Begin working Row 2 with red yarn. Continue knitting Rows 1-2 until this red portion measures 4”
Repeat instructions from First Yellow Join to Red Block Join until scarf measures 75.5” or desired length.
Cast off in pattern and weave in ends.
Abbreviations
* *: repeat instructions between asterisks the number of times indicated
CO: cast on
K: knit
knitwise: as if to knit
P: purl
purlwise: as if to purl
Sl: slip a stitch
St(s): stitch(es)
Support Sheep & Stitch
While the pattern instructions and video tutorial are free and available above, for the price of a butterbeer at the Hog’s Head, you can support Sheep & Stitch by purchasing a PDF file of this pattern. This 3-page PDF file is beautifully laid out and ready to be printed!
Upon purchase, the pattern PDF file will be delivered to you by email. Thank you for your support!
I accidentally bought Paintbox Simply Chunky Yarn instead of Simply DK 😭 Can I still make this or would it turn out bad? What would be the differences?
Hi! The difference would be that the scarf would be thicker because the chunky yarn is thicker than DK. You can consider reducing the number of stitches if you want the scarf to be thinner, or just experiment to find a width that works for you.
Hi! I was just wondering whether this’ll work with worsted weight yarn/if it’ll look much different? I’m having trouble finding dk weight yarn in the correct colors where I live. Thank you!
Yes worsted weight would work!
Easy to follow instructions and great tutorial video! Thank you!
Hi..love the pattern. For the stripes, how do you end on a Row 1 if you’re knitting 4 rows of colour? Seems like youd need to knit 5 rows to get there?
Hello!
Wonderful tutorial thank you!
I am finding that when I do the first yellow join it looks great, even, but by the end of that row it is not even. The last stitch is higher, making the entire yellow block off by one at the end of the row. A little red loop into the yellow. I’ve redone it to make sure there wasn’t an error. Any suggestions?