How to Knit an Infinity Scarf Beginner Pattern (Cushy Cowl)
May contain affiliate links (what's this?)An infinity scarf is a bit more challenging than a regular scarf, but not so hard as to scare off beginners.
It’s a project that introduces a few essential techniques that will move you beyond noob territory and closer to the realm of hats, socks and mittens!
Best of all, this infinity scarf is knit with super bulky yarn, which produces a thick fabric that highlights the sculptural and springy qualities of garter stitch. Super bulky yarn also knits up quick for instant gratification! Win-win!

Materials & Notes
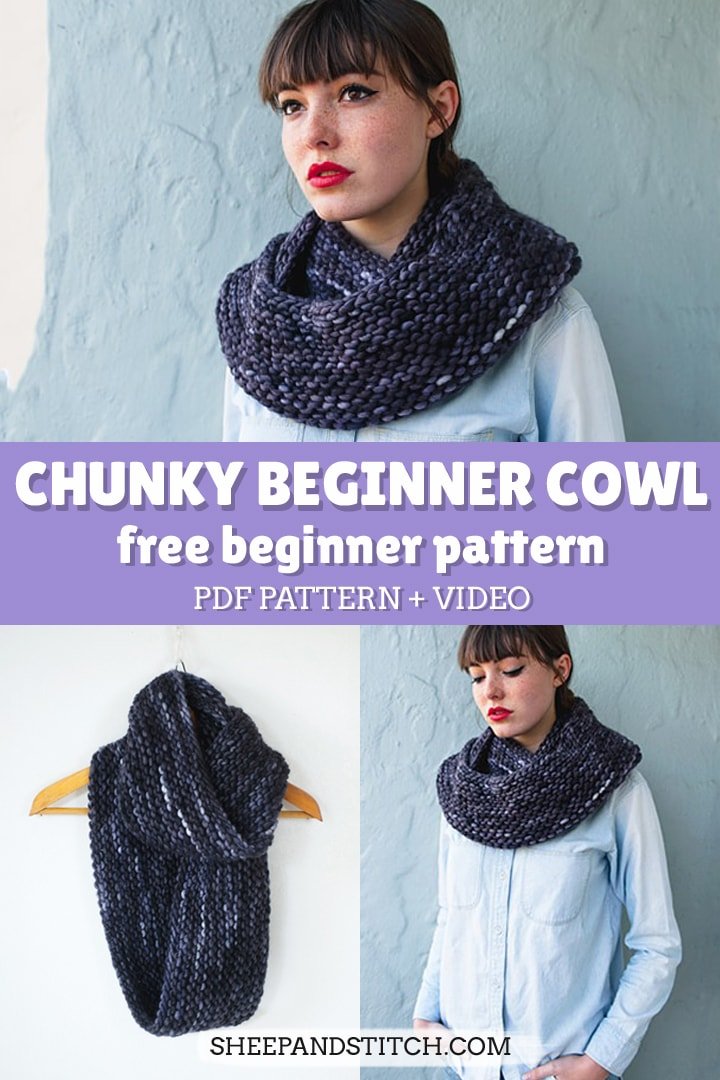
Yarn: 2 skeins of Malabrigo Rasta Super Bulky Yarn in color Pearl Ten
Recommended Needles: 1 pair of 32″ US 17/12mm circular needle (use a needle size that gives you the gauge listed below – every knitter’s gauge is unique!)
Notions:
- large stitch markers
- retractable soft tape measure (similar)
- sharp scissors (similar)
Finished Measurements: circumference is 50” and width is 7”
Gauge: 8 sts = 4″(10cm) in garter stitch
Instructions:
Using the long-tail cast on, cast on 100 stitches and join in the round, making sure not to twist stitches.
Place a stitch marker to mark the beginning of the round.
Round 1: knit all stitches to end of round
Round 2: purl all stitches to end of round
Repeat these two rounds until piece measures 7″ or desired width.
Bind off loosely on a knit row and weave in ends.
Did You Make the Cushy Cowl? Share your project on Ravelry (aka. Facebook for knitters), add your project for the Cushy Cowl and see all the other Cushy Cowls made by knitters around the world!
You can download the pattern as a PDF file below. For best viewing, save and open the file in Adobe Reader or Preview (for Mac users). Scroll down the page to download the pattern PDF.

One more question: You recommend a loose bind off. Would Jenny’s stretchy bind off be too loose or is that OK to use with this cowl?
Hey Isla,
Sure! You can try JSSBO (here for those of you who are interested: https://www.knitty.com/ISSUEfall09/FEATjssbo.php) if you tend to knit and cast off tightly. I was able to cast off normally without the edge being too tight.
You can try using JSSBO for a dozen or so cast off stitches, look at the edge and decide if it looks okay. If so, then keep on going! If it looks too loose and splayed, then revert back to the regular cast off.
I didnt check the stitches to make sure they werent twisted, and it ended up twisted. Im still knitting it, so is there a way to fix it ehile kntting or after knitting ir not at all? Thsi is actually my second cowl and surprisingly my first one turned out perfect, but i guess i was overconfident and it messed up. If there is a way to fix this, i would reslly appreciate 🙂 thank you for your awesome tutorials. You make them better than anyone:) 😉
Hey Zahra,
Unfortunately, once the stitches are twisted, they will remain twisted. There’s no easy fix for this other than ripping out your work and casting on again. The trick is making sure that your stitches are untwisted before you join in the round. However, for a cowl of this length, a twist won’t be *that* noticeable. If anyone asks, you can tell them that you did it on purpose! Call it mobius strip, which is actually a thing: https://en.wikipedia.org/wiki/M%C3%B6bius_strip
How long is this scarf? I want it to wrap around the neck several times.. its hard to tell by the pictures.
Also, do you have any reccomendation on how to make it in two colors?
Hey Karen,
If you get gauge, the cowl will be 50″.
For a two color cowl, you can cast on with one color and knit until you’re ready to switch colors. Then leave a strand of about 10″ of the first color and cut the yarn. Join the new color by wrapping the yarn around the needle, leaving a tail of 10″ and start knitting with that new color. When you’re finished, weave in the ends of the two yarn strands where you joined a new color. Hope that makes sense!
Thanks for answering. Not sure what the gage is…the printing was all fuzzy when I downloaded and tried to print the pattern.
Hi Karen, are you able to view the pattern clearly on your computer? The gauge is 8sts = 4″ in garter stitch. Check out this post on gauge if the concept is new to you: https://sheepandstitch.com/what-is-knitting-gauge/
Hello!
I wanted to ask what length your circular needles were? I’ve bought yarn that requires 8mm needles but I know nothing about the length. Please help!
Hey Georgina! A circular needle that’s between 32-40″ is a good size.
Hi. Thanks for the video. Quick question. The color that yo name for the yarn is pearl ten but when I look to buy it it looks more beige in the picture. Can you tell me where to purchase I
The yarn and if that is the name of the color?
Hey Ina, The color is indeed Pearl Ten. I just did a quick search and it shows that Fabulous Yarns has it in stock here: https://www.fabulousyarn.com/malabrigo_rasta_069pearlten.shtml When I look at the photo for the color, it looks about right! It doesn’t show the purple shading, but that could just be the lighting of the yarn.
Hello Davina!
I started my cushy cowl pattern today and as I finished purling my second row, I realised there was a big float of yarns between the needles. I tried pulling my tail yarn to see if it gets fixed but I think I opened a stitch in the process. Attaching a pic here, do you think that’s what happened? What should I do to fix this? Starting over is not an issue, if you think that’s the best solution. Do let me know!
Just a heads up, I am using two colour threads together on a 12mm needle set.
Thank you 🙂
Meha
Hey Meha!
A gap is pretty normal after the first round of circular knitting. However, you can control how big it is. To avoid a big gap, when you join your yarn in the round, give the first stitch a good tug to ensure less slack between the stitches. To totally close the gap, once you’ve finished your project, you can weave the tail from your longtail cast on through the gap to close it up neatly. Hope this helps!
Thank you!
I finished my cowl! I’m a little bit sad that I didn’t seem to knit it loosely enough… I used Malabrigo rasta but it came out smaller than I thought. That said, I’ve had plenty of compliments on it since I’ve worn it and I love this yarn. Thanks for the tutorial!
Oops that image is pretty massive sorry :S!
It looks awesome! Great job!! If you find that the cowl is a bit too tight, you can lightly block it. This means that you can dunk it in some room temperature water, let it soak for about 10 minutes, and then squeeze out the water (don’t wring it out or it might felt!), and lay it out to dry on some towels. When you lay it out to dry, you can stretch the cowl to the size that you like. Then, when it dries, it will dry in that shape! It’s pretty great. Here’s a short tutorial on how to block a sweater, but the same principles apply to the cowl: https://youtu.be/7dL0wggBy7I
One request: I’m trying to highlight knitter’s projects on the Facebook page so that other would-be knitters can see that knitting is not scary and totally possible! If you feel comfortable, it would be awesome if you can post your finished cowl to the Sheep & Stitch FB page here so that everyone can see how awesome it turned out!: https://www.facebook.com/sheepandstitch
Ah great, I’ll give it a try. And sure I’ll post it! Thanks again.
Hi Davina, I screwed up somewhere, when I went into the purl row, I was ruling and it was no longer connected 🙁 I’m left handed so this is duly hard for me. Any idea what I did wrong? Thank you – the videos a re really helpful. I know how to knit and purl but I think it’s my left handed kitting that is messing me up 🙁
Hey Sandra! Sorry to hear that! I know knitting can be tough for lefties. Can you explain what you mean by, “I was ruling and it was no longer connected”? Do you meant that the stitches weren’t connected in the round? Did they slip off the needle when you were just starting to join?
A great video. You explained everything so well which made it easy to follow. You are a good instructor. Thanks.
I was only able to find size 15, 36″ circular needle. I cast on the 100 stiches and they don’t even cover all the wire. Should I cast on more?
Hey Sara,
A lot of the times, the cast on stitches can bunch up on the needle. You can try stretching them out so that they spread out onto your needle. Use your hand to grab hold of a bunch of the cast on stitches and gently pull them away from you so that the stitches spread. Do this across your whole cast on row and see how much you can get the cast on stitches to spread. If the stitches are still not covering the whole needle, then you can consider casting on more stitches. This will make your cowl wider though, so do keep that in mind. Hope this helps!
Hi Davina! One issue I’ve run into is that the circular needles I bought are only 29 inches in length (from needle tip to needle tip) instead of the 32 inches that is stipulated in the directions. I was wondering if this might cause me problems while attempting to knit this cowl.
Hey Michele, the 29″ is perfect! The yarn may bunch up a bit while on the needles, but you’ll be able to knit the cowl.
how many skins?
I used two skeins of Malabrigo Rasta to make this cowl. The exact yardage is listed in the PDF pattern which you can download for free here: https://sheepandstitch.com/shop/cushy-cowl-knitting-pattern/
I am a total newbie…….saw your utube video AND FELL IN LOVE WITH THAT COWL.
Searched you out and found your web site. Great site. Thank you.
Right now I’m knitting my first project, practice knitting, but my next project is definitely
that wonderful cowl. I’ll be returning time and time again.
Many thanks, Carol from Chicago
Hello
Do you have any tips on how to alter this for a 5 year old?
Thank you
Hey Jo! You can check out this video on “How to knit a seed stitch cowl with any yarn”: https://youtu.be/J64WrUkaU0o At the 16:06 mark, I go through how to customise the exact circumference of a cowl. You can use this same method to customise the circumference for the cushy cowl. It involves deciding how large you’d like the cowl to be, knitting a small swatch to determine how many stitches make up an inch and then multiplying that number by the number of inches you want your cowl to be. Hope that helps!
I seem to pick up a stitch every time I do a purl row!
In the tutorial it said to wrap around the needle before moving the stitch marker, but then that wrapped around bit ends up becoming a stitch. I’m not sure how to fix this 🙁
Hi! It’s been awhile since I’ve re-watched this tutorial, but I don’t remember saying that you should wrap your working yarn around the needle before moving the stitch marker over. This is called a “yarn over” and will definitely create a new stitch, which we don’t want!
Since this is happening on a purl row, I think what I meant to say is to bring your yarn up front, because the next stitch is going to be a purl stitch, which requires your yarn being up front and not in the back. So, you’re not wrapping the working yarn around your needle and then purling. You’re just bringing your yarn up front in preparation for that new purl round. Does that make sense? Sorry for the confusion!
Dear Davina
I had a question on the knitting patterns for the cowl and big hat. I come from the Netherlands, and getting the needle size and yarn size you show can be difficult to achieve. I was therefore wondering about how many more cast on stitches, if at all, I should add.
Needle size: 9mm
Yarn: 10×15 is 7. it recommends needle sizes 6.5-7 (USA 10).
For the big hat I was wondering if I should increase the base to 56 cast on stitches. In the end I would have 7 stitches after decrease. Or if its better to leave it as you show?
For the Cushy Cowl if i should increase the base stitches from the given 100 stitches. I was thinking maybe 20 extra?
I just finished the cowl and not sure where I went wrong! The scarf turned out okay but not as long (39 in.). I cast on the 100 stitches, used circular needles US 11, and super bulky yarn. I am a new knitter, and love it! Your site has helped me sooooo much. But obviously I’m missing something. Help!
Hey Cindi! Congrats on completing the cowl! To get the exact same measurements as the cowl in the pattern, you’ll need to have the same knitting gauge as what the pattern calls for. That would be 8sts=4″/10cm in garter stitch.
So if you’re able to knit a square of fabric with your yarn and needles in garter stitch, and have 8 stitches measure out to 4″ or 10cm, then you’ve got the same knitting gauge as the pattern, and your cowl will come out to the same measurements. Here’s more on knitting gauge: https://sheepandstitch.com/what-is-knitting-gauge/ However, checking the knitting gauge happens *before* you start knitting.
Since you’ve already finished your cowl, what you can do is block it so that it stretches out and becomes longer. Blocking entails soaking your finished cowl in lukewarm water, for about 5-10 minutes, and then pushing the water out (not wringing it, never wringing it!), and then laying it out to dry.
When your knitting is wet, you can stretch it, pull it, and basically widen or lengthen it as you see fit. Once you’ve pushed and pulled your cowl to the length you like, use sewing pins or safety pins to pin your cowl in place. Your wet knitting will dry in that shape. It’s pretty cool, and a real lifesaver if your knitting turns out a bit small. Here’s a video on blocking a sweater: https://youtu.be/7dL0wggBy7I The same principles apply to blocking a cowl. Hope that helps!
Hi. can i do this with simple wooden needles?
Hi Prarthi,
Do you mean two straight needles as opposed to the circular needles? For this pattern, you really do need a circular needle (the big long one with a flexible cord). It’ll be pretty impossible to knit the cowl on two regular straight needles.
However, you could knit a similar cowl with straight needles by casting on a number of stitches (depending on your yarn weight and the width that you like) and then knitting a long scarf. Once you cast off, you can sew the two ends of your scarf together into a loop, thereby making a cowl. Hope that helps!
Hi! I have started with a medium weight yarn and 6.5mm, 29in circular needles with 111 cast on stitched for a 6in. wide cowl scarf. However, my stitches are stretched out so far over the needles and should not stretch any further I don’t think. I only want a 6in. wide cowl. Are my calculations wrong? should I just use straight needles and sew it together?
Thanks so much! Alison