
How to Knit a Chunky Hat for Beginners
May contain affiliate links (what's this?)This chunky hat knitting pattern is perfect for beginners! This free hat pattern produces a warm, cushy fabric that knits up quick. It’s also a great hat pattern for ambitious beginners looking to expand their skills beyond the basics.
With its oversized pom and reverse stockinette stitch peeking out from the brim, this hat manages to be both playful and practical. Made with super bulky yarn, it knits up very quickly!
In this post, you’ll find the free hat pattern and two video tutorials that walk you through the entire hat knitting process.
If you’d like to purchase a PDF file of the pattern, head to the pattern shop or click on the button below. Thank you for your support!


Materials & Notes
Yarn:
- 1 skein Cascade Yarn Magnum in color Ruby
- 1 skein Malabrigo Rasta (colourful and hand-painted)
Recommended Needles:
- 16″ US 15/10mm circular needle
- US 15/10mm double pointed needles (use a needle size that gives you the gauge listed below – every knitter’s gauge is unique!)
Notions:
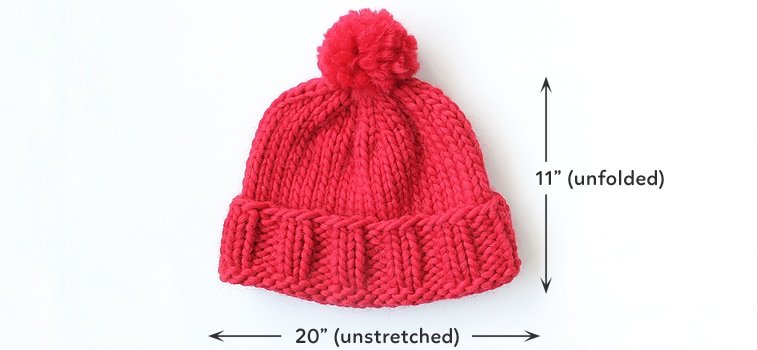
Finished Measurements: circumference is 20” (un-stretched)
Gauge: 9 sts = 4″(10cm) in stockinette stitch
Notes:
2×2 Rib:
Round 1: [K2, P2] to end of round
Repeat this round for as long as you’d like 2×2 rib
Chunky Hat Knitting Instructions:
Using the long-tail method, CO 44 sts on circular needles and join in the round, making sure not to twist stitches. Place a marker to mark the beginning of the round.
Knit in 2×2 rib until piece measures 2.5″ from cast on edge.
Knit in stockinette stitch for 6.5″
Piece should measure 9″ from the cast on edge (2.5″ of rib + 6.5″ of stockinette = 9″).
Move on to the decrease round. (When decreasing, switch to DPNs when stitches become too sparse to knit with circular needles.)
Decrease Rounds:
Rnd 1: *K2, K2tog* to end (33 sts)
Rnd 2: Knit 1 row even
Rnd 3: *K1, K2tog* to end (22 sts)
Rnd 4: Knit 1 row even
Rnd 5: *K2tog* to end (11 sts)
Rnd 6: *K2tog* to end, then K1 (6 sts)
Cut yarn and weave through remaining 6 sts. Bring yarn to the inside of the hat, make a knot to secure and weave in ends.
Pom Pom:
Make a pom pom 3.5 – 3.75″ in diameter and sew to the crown of your hat. Weave in ends.
Not sure how to make a pom pom? Check out this step-by-step tutorial on making the perfect pom pom.
Abbreviations:
* *: repeat sequence between * * as many times as noted
CO: cast on
DPN(s): double pointed needles
K2tog: knit two stitches together
K: knit
P: purl
Sts: stitch(es)
Did You Make a Big Hat? Share your project on Ravelry (aka. Facebook for knitters), add your project for the Big Hat and see over 150 other Big Hats made by knitters around the world!
Help Support Sheep & Stitch!
While the pattern instructions and video tutorial are free and available above, for the price of a fancy coffee, you can support Sheep & Stitch by purchasing a PDF file of this pattern.
This 3-page PDF file is beautifully laid out and ready to be printed and marked up by you!
Upon purchase, the pattern PDF file will be delivered to you by email. Thank you for your support!
Where do you buy your bulky yarn from?
Hi Danielle, I got the super bulky yarn from a store in Vancouver called Three Bags Full. However, both yarns are widely available online. WEBS carries both of them (here: https://www.yarn.com/product/webs-knitting-yarns-cascade-magnum/ and here: https://www.yarn.com/product/webs-knitting-crochet-yarns-malabrigo-rasta/). You can even use Lion Brand’s Thick & Quick!
Can you use lion brand thick and quick with the 10 mm needles? Because the yarn calls for 9mm. And if I use the 9 mm will it make it a lot smaller? And if I use the 10mm with the thick and quick will it make holes?
And how much smaller would it be to use 9mm. Would it be good for an adult?
Sorry for all the comments!!!! But if I use 9mm needles, can I add an extra 4 cast on?
Hey Ethan!
Sorry for this late reply. Yes, Lion Brand thick and quick would be a good substitute. I don’t think using a 10mm needle would make the knitting too “holey” although the fabric might be a little looser.
However, the really important thing to consider when choosing yarn and needles is the knitting gauge. If you’re able to hit the knitting gauge for this pattern (9 stitches = 4″ in stockinette stitch), using your chosen yarn and needle size, then you can be confident that your hat will match the finished measurements for this pattern (20″circumference un-stretched). Does that make sense? Here’s more info on knitting gauge: https://sheepandstitch.com/what-is-knitting-gauge/
As for casting on more stitches, you could cast on an extra 4 stitches for a total of 48 cast on stitches. Follow the decreases as written. You will have a different stitch count at the end of each decrease row (36 sts instead of 33; 24 instead of 22 etc.) but the basic structure will still be the same.
Hope that helps!
If I wanted to make this for a guy how would I go about making the hat bigger?
Hi Tiffany, the easiest way would be to use yarn that’s a little bit bigger (that has a larger gauge) than what’s called for in the pattern. This pattern is designed to fit an “average sized head.” Does the guy have a pretty large head?
Another way around this is to knit the hat and then block it a bit once you’re done. What this means is you can wet the hat a little bit with water – say about 20-30% wet, not 100% soaking wet! – and then stretch it out to the size you’d like it to be. You can either pin it in place or stuff a ball or balloon into the hat to keep its shape. The ball or balloon should be about the size you want the hat to be.
The water will relax the fibers of the yarn and make it flexible to manipulation. So, once it dries the hat will be the size that you stretched it out to be. Ta-da! It’s an easy fix. Heads tend not to vary *too* much in size, so we can play around with sizing in these two ways. I hope this helps!
Hi Davina,
I watched the tutorial on making the hat, and you refer to the 6 inches of knit stitches as stockinette. I am very much a newbie knitter, and have found your site very helpful and fun, but I thought stockinette stitch was alternating knit and purl stitches?? I knit a scarf with all knit stitches and I think it was called garter stitch, so I am confused by this. Can’t wait to start my hat!! Thank you!
Hey Kirstin! There are usually two ways to knit one stitch, and what way you use depends on whether you’re knitting on circular needles or two flat needles.
On flat needles, knitting all of your stitches and rows will give you garter stitch. But on circular needles, knitting all of your stitches and rows will give you stockinette stitch! Funny, right?
I’ve laid this two-way-to-knit concept in two videos, so hopefully they’ll help you make sense of it!
https://sheepandstitch.flywheelsites.com/how-to-knit-stockinette-stitch/
https://sheepandstitch.flywheelsites.com/how-to-knit-garter-stitch/
Ah, I see now, and I had missed those videos in your glossary – very helpful, thank you!
You’re welcome! Glad they helped you out 😀
When using the 5 double sided needles, did you put 8 stitches on 4 of them and then use the 5th needle to knit, or did you put 8 stitches on 3 of them and 9 on the 4th, then use the 5th to knit?
Also, did 90yds allow for the hat and the pom pom?
Hey Nathan!
In the video, I put 8 sts on 3 DPNs (double pointed needles) and 9 sts on the fourth DPN and used the fifth needle to knit. However, it doesn’t really matter how many sts you put on each DPN as long as they sit comfortably on the needle and don’t fall off.
90yds is the minimum amount of yarn you’ll need for the big hat and pom pom. I was able to get a full hat with pom with just one skein of Malabrigo Rasta (90 yds per skein) with a few yards leftover. If you’d like a bit of buffer just in case or if you want a crazy super thick pom pom or you want to lengthen the hat, consider getting a skein with more yardage. But if you knit the pattern as is, 90 yards should be okay. Hope this helps!
Thank you for your response and I love this site. Minimal, clean, and a fun learning experience. I hope to see it grow with more tutorials and shop.
I’m a small girl but the girl in the photos looked about my size so I followed the pattern and the hat is comically giant!! I’m so sad. I saw you had mentioned how to stretch out a hat but do you know any ways to make it smaller?
Hey Jill! I’m so sorry your hat turned out so huge. The issue, I think, is gauge. (More on gauge here: https://sheepandstitch.flywheelsites.com/what-is-knitting-gauge/).
I didn’t talk about gauge in the tutorial video because I wanted to simplify the knitting experience, but in hindsight, I probably should have given it a passing mention. What it boils down to is this: the combination of your knitting tension (how tightly or loosely you knit) + your yarn + your needle size got you a larger gauge than what the pattern specifies (9sts=4″). I think this is why your hat is so much larger than the finished measurements of the hat.
If you tweak one of these variables (drop down a needle size or switch out a less bulky yarn) and get the pattern gauge, then you’ll know for sure that you’ll end up with a hat that’s the same size as the finished measurements on the pattern (20″ circumference and 11″ in height unfolded).
Okay, so now I’ve written you a mini essay on gauge! What can you do to make your hat smaller?
So, if the hat is insanely huge, like there’s no way you can bunch it up with an elastic without it looking like a muffin hat, then… your best course of action is to experiment with either your needles or yarn in order to get the right gauge, and then… knit a new hat. I know! So painful. But it’s the best way to know that you’ll get the exact sized garment as the one in the pattern.
There are a few other hacks that don’t involve re-knitting the entire hat, but they’re for slightly loose hats and not “comically giant” hats. You can check them out and see if they’re worth pursuing. The tutorial is put out by TechKnitting, a super geeky knit blog I love: https://techknitting.blogspot.hk/2008/04/how-to-line-hat-headband-style-with.html and https://techknitting.blogspot.hk/2011/02/socks-falling-down-consider-elastic.html
The latter link is about tightening up socks, but the principle still applies. These tutorials are pretty involved, and I suspect it might take less time to reknit the hat. Either way, let me know what you decided! You can always send me a picture of the hat using the comment form. (There’s an upload image option right below this comment field).
Best of luck!
Thank you so much! That glossary is fantastic, that makes total sense. I will go down in yarn weight and try again! Also, the TECHknitting website is so great.
I’ll leave the other hat be as a reminder to check all the instructions before I knit a project. Plus, it’s still the second thing I have ever successfully knitted thanks to y’all!
Thank you for your help and patience!
I started making this yesterday and so far so good! I bought the Cascade in a dark green and when my daughter saw it she said “Yes!!! I’ve always wanted a Mike Nesmith hat!”
would it be alright to use 7 inch double-pointed needles? Or must they be smaller?
If you mean the length of the DPN, then yes, a 7-inch length for DPNs is perfectly acceptable. If all your stitches can fit on them comfortably, then you’re golden!
Hi! I followed the instructions on size of yarn (super bulky), 16” US15 circular needle, and CO 44 sts. However it felt it was too few? The cord is definitely longer than number of sts. I added 4 sts, was still too short for needle. Then added more. A total of 16 sts more. Joined in the round and started knitting, however it was very uncomfortable and still definitely too small for cord/needle length. No idea what happened!
Is it possible to use normal sticks instead of these round ones doing this pattern?
Hi Hika, Yes, you can use a set of five double-pointed needles to cast on your hat instead of circular needles. The pattern isn’t written to be knit with two needles however.
Hiya, I’m not surer if I’m just really bad at knitting or I’m doing something wrong, but for the first bit, the purl 2 knit 2, its just looking so awful agh any words or advice?
Hey Kim, Uh-oh! Awful how? Are you knitting your knit stitches and purling your purls? Try uploading a picture here and I’ll try to diagnose.
Sometimes new knitters find that their ribbing is a bit loose between the knit stitches and the purl stitches. If this is your situation you can try tugging on your working yarn a bit as you switch between a knit and a purl stitch to make sure there isn’t a loose gap.
Either way, take a picture and upload here and I’ll try my hand at playing knitting doctor! 😛
Hi, I love this pattern and I’ve knitted it a couple of times now and it always turns out beautifully. I was just wondering what colour the Malabrigo Rasta hat in the pattern is? It’s such a lovely colour! Thanks!
Hey Raewyn,
I believe the colorway is Arco Iris, although this colorway is notorious for a lot of variance between dye lots (do a Google search for “Malabrigo Arco Iris” and you’ll see what I mean!). I happened to snag a skein that was lighter than the rest at my local yarn store. The Loopy Ewe has some Arco Iris that looks pretty similar to the one I used: https://www.theloopyewe.com/shop/p/1B1D8EB5-Rasta-Arco-Iris-866 Hope this helps! And I’m sooo pleased that the Big Hat has turned out well for you!
Thanks alot for this pattern 🙂 I have never knitted anything for myself, but I just finished this hat in Burgundy, and it turned out so beautiful! Thank you so much 😀 <3
Love from Norway
Awesome! Please share a photo here if you can. Would love to see it! Or you can always hit me up on instragram @sheepandstitch!
This the best big hat ever! Thanks for making instructions that are super easy to follow AND a great video. You rock!
Thanks Marie! I hope the Big Hat turned out well for you!
Hey Davina! I was wondering if when it comes to the part of the hat were I have to switch to double pointed needles, if I could just keep using round needles. Will it come out the same?
Hi Samantha, apologies for the late reply. You can definitely keep using your circular needles, but as you decrease, your knitting will shrink to the point where you can no longer use the circular needles, and that’s the point when you’ll need to migrate your knitting to DPNs.
hello!
loved this video as i have just started knitting and i cant wait to knit this…
one issue i downloaded the pattern and the font is so squashed together i cant read it, i have also watched the video but would like the pattern in front of me…is there anyway of emailing it to me?
Many thanks!
Holly
Hi Holly, Yes, just sent you an email with the PDF attached. Let me know how it goes. If you’re still unable to view it, I’ll send a plain old .doc file or a JPG of the pdf.
I love your video! It is very easy to follow. I just started knitting the hat now, but wondering if it would be okay to use the double pointed needles size 10 instead of 15? Please advise. Thank You!
Hi Phairin, So sorry for the late reply! A US 10 needle is 6mm, which is considerably smaller than the recommended US 15 needle size, which is 10mm. If you try to knit the hat with bulky weight yarn with a US 10 needle, your hat will be really small! Not to mention the knitting will be very tight. I wouldn’t recommend it! If you’ve only got US 10 needles, I would suggest another knitting pattern that recommends a needle of that size and a yarn weight that complements that needle size (probably a worsted or heavy worsted yarn). Hope this helps!
Hi Davina!
I am a kid who like to do crafts.
This time I start knitting.
This video was so great for me (for beginner) to make a hat.
But I have some problem. I don’t have 16inch needles. But longer ones.
The place where I live, I can’t find the yarns or needles.
I REALLY want to make a big hat.
but is it possible to make the hat with longer needles?
Please answer my question as soon as possible.
Thanks!
Hi HanNa, You can knit the big hat on straight needles. Instead of joining the hat in the round, you can knit the hat back and forth. Just remember when you’re knitting stockinette stitch on straight needles, you’ll need to knit one row and purl the next row. Decrease the hat as the pattern says (remembering to purl on the purl side and knit on the knit side). Once your hat is complete, place the right sides of the hat together and use a sewing needle to sew it together!
I made the big hat and its great but doesn’t fit my head I had to give it to my 4 year old. Can you tell me how many I should cast on to increase the size and the length that would work?
How many should I cast on and increase the length to make it bigger?
Hi Macey, It really depends on the size of your yarn and needles. Did you use bulky weight yarn and US 15 needles to knit the Big Hat?
I love this pattern and your videos are awesome! I am a newbie at knitting, but this pattern is very easy. I would love it if you did a video with a Fair Isle design. Can I talk you into it? I’ll send you chocolates! Liz
Hey Liz! Ah, Fair Isle. So beautiful, so fickle. I love colorwork too, and fair isle is definitely on my to-do list, but because I tend towards being a lazy knitter, I like incorporating color work as easily as possible! This usually involves slipped-stitch color patterns. And a really pretty pattern that uses this technique is just around the corner, so no chocolate bribing necessary!