• Skip to primary navigation
  • Skip to main content
  • Skip to primary sidebar
  • Skip to footer

Sheep and Stitch

Knitted goodness made by you

  • About
  • Start Here
  • Patterns
  • How To Knit
  • Knitting Library
  • Blog

Knitting Library  >  Techniques

M1R and M1L Knitting Increase

Published on December 3, 2018 By Davina | May contain affiliate links (whats this?)

The M1R knitting increase is really similar to the M1L increase. In fact, they’re two sides of the same coin!

Both the M1R and M1L are techniques that will increase your knitting by one stitch. The only difference is the direction of the increase. The M1R slants to the right, while the M1L slants to the left.


Sometimes a knitting pattern will simply ask you to “M1” (aka. “make one”). In these situations, you can knit either an M1R or an M1L. It’s totally up to you.

While working an M1R or M1L, you might wonder why you need to slip the strand of yarn from one needle to another. It seems complicated, right?

The purpose of picking from the back or front and slipping to and fro is to ensure that the strand of yarn is twisted. This ensures that the increased stitch does not have a big hole in it. That extra twist keeps the stitch tight.

So, when you knit into your twisted stitch, you should feel a bit of resistance. If the picked-up stitch is loose, then you know that you haven’t twisted the stitch properly.
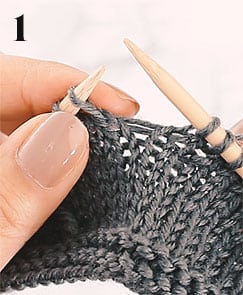
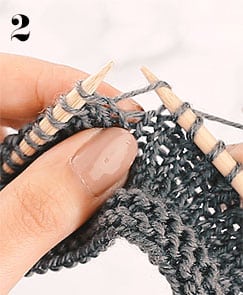
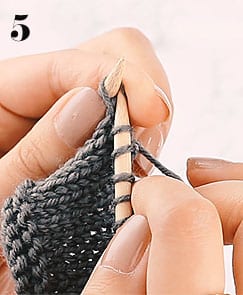
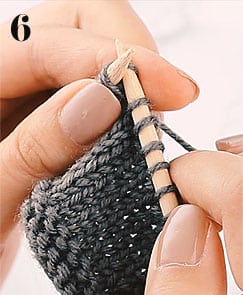
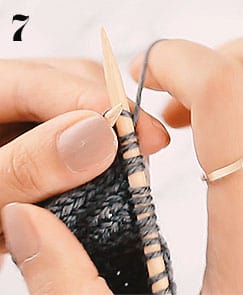
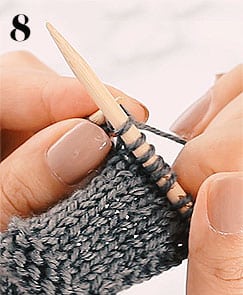
M1R Photo Tutorial

Notice the strand of yarn between the two stitches where you want to increase.
Pick up the yarn from the front to the back with right needle.
Use the left needle to pick up the strand from back to front.
The strand of yarn is now properly twisted on the left needle.
Use the right needle to knit into the strand of yarn.
Push into the strand of yarn as if to knit…
… wrap the working yarn around the right needle and pull out a new stitch.
You’ve now made an M1R increase.

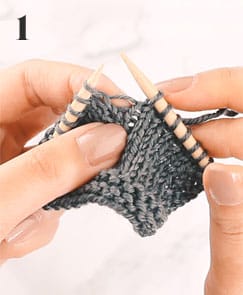
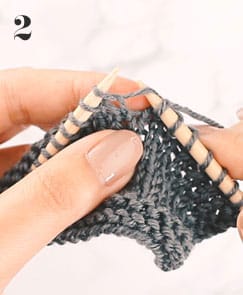
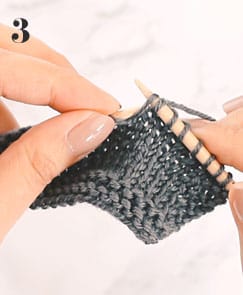
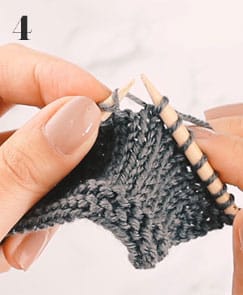
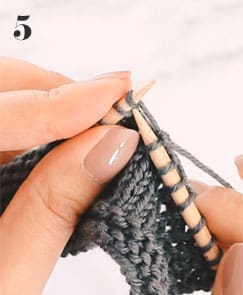
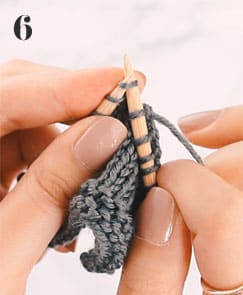
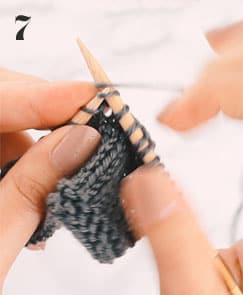
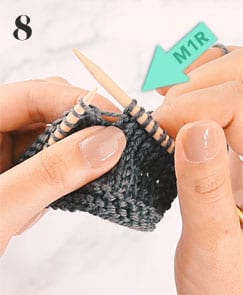
The method above shown in the photo tutorial is what I use for M1Rs. I find it effective and comfortable. In the video up top, I cover this method plus a second method for M1R increases. If you’re curious, check out the second method in the video at the 2:08 mark.

M1L Photo Tutorial

M1L knitting increase tutorial
Notice the strand of yarn between the two stitches where you’ll make the increase.
Lift the strand of yarn from front to back with the right needle.
Lift the strand of yarn from front to back with the left needle.
The strand of yarn is now twisted and on the left needle.
Use the right needle to knit into the back of the strand of yarn.
Push the needle into the strand of yarn from the back. There will be some resistance.
Use the working yarn to knit into the strand of yarn.
Pull the new stitch off the left needle.
You’ve just increased by one stitch using the M1L

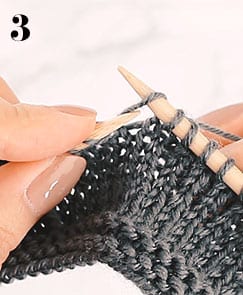
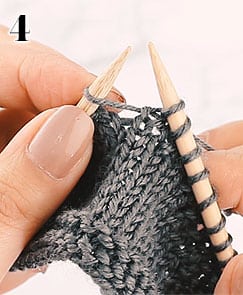
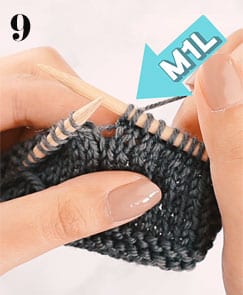
The method above shown in the photo tutorial is what I use for M1Ls. I find it effective and comfortable. In the video up top, I cover this method plus a second method for M1L increases. If you’re curious, check out the second method in the video at the 3:34 mark.

hand holding knitting

Pin
Share
Tweet
Pin
Share
Tweet

Category: Techniques / Subcategory: Increase

Stay In the Loop!

Sign up for free patterns, tutorials, sales and promotions. Only good stuff. Never spam. Unsubscribe anytime.

SUBSCRIBE FOR UPDATES

Reader Interactions

Comment 1

  1. Paul Park says

    January 31, 2022 at 7:30 am

    Loved your videos on M1L and M1R. I could definitely learn a lot from these tutorials. I used to knit years ago…long, long, long time ago…but stopped. Unfortunately, I have forgotten so very much. Hopefully, it will somewhat come back. But, for now, I am trying to relearn. It seems harder for some reason to relearn this time around. Anyway, your videos are a much welcomed help. Your cast on video also showed me where I was going wrong on the long-tail cast on method. I had to use another method since I failed with that one. Now, I can do it thanks to you. I shall revisit sheepandstitch.com a lot. Some knit books don’t explain techniques as well as you do. No doubt, the video is what makes the difference. Thanks.

    Reply

Leave a Comment Cancel reply

Your email address will not be published. Required fields are marked *

Primary Sidebar

Most Popular

  • 3 beginner knitting mistakes 3 Beginner Knitting Mistakes and How to Fix Them
  • how to knit a scarf for beginners How to Knit a Scarf for Beginners
  • egyptian knitting The History of Knitting Pt 1: Mysterious Origins

Categories

Footer

Navigate

  • About
  • How To Knit
  • Patterns
  • Blog

Support

  • Privacy and Affiliate Disclosure
  • Technical Support
  • FAQ
  • Contact
  • Advertise

Instagram

Follow Us On Instagram

Say hello to the Blank Slate Hat! It’s a simple Say hello to the Blank Slate Hat! It’s a simple design that can be decorated and embellished to suit your personality!

This chunky hat is knit on straight needles and seamed together with mattress stitch. If you can #knit, purl, and cast on, then you’re ready to knit the Blank Slate Hat! 

This version is made extra cute with two pom pom ears. But purists are welcome to add just one centred pom pom 😊

Grab the #freeknittingpattern and video tutorial in the profile link. Happy knitting! #knitting #knitstagram #knittersofinstagram #knitting_inspiration #knittersgonnaknit #knitknitknit #knittingaddict #knittinglove #knittingforbeginners #chunkyknit #chunkyknits
This chunky lace scarf is a great introduction to This chunky lace scarf is a great introduction to lace knitting! 🕸 

In this tutorial, you’ll learn basic lace stitches like the yarn over (YO), which gives lace its open airiness, and two decreases (K2tog and SSK), which slant to the left and right respectively.

You’ll also learn how to block your scarf (a must for all lace patterns) and attach a fringe. Click the profile link for the #freeknittingpattern

Yarn is @lanagrossa Ragazza Lei from @lovecraftscom 

#knittersofinstagram #knitstagram #knitspo #knitspiration #igknitters #knittingpatterns #laceknitting #laceknittingpattern
This beanie takes inspiration from classic watch c This beanie takes inspiration from classic watch caps. Fun fact: these hats got their name from Navy sailors who wore them while keeping watch in the night.

My take doesn’t stray far from the original caps. It’s knit in a beginner-friendly 1×1 rib and has a sleek decrease that keeps the rib pattern intact.

It can be worn cuffed for a fisherman’s look or un-cuffed for a slouchy modern feel.

So knit up a piece of history with this #freepattern at sheepandstitch.com

#knittersofinstagram #knitting #freeknittingpattern #beanie #watchcap #knitting_inspiration #knitstagram #knitspo #knitknitknit #knittingpattern #hatpattern #knittersgonnaknit
Want to add a cuff to your chunky slippers to turn Want to add a cuff to your chunky slippers to turn them into booties? Well, I’ve got a tutorial for that! Find it in the profile link and get knitting! #knitting #knittersofinstagram #knitstagram #knitspo #knittingpattern #knittinglove #freepattern
If you’ve got cold feet these slippers will keep If you’ve got cold feet these slippers will keep you warm all winter long! Knit in chunky weight yarn, these slippers come together in no time at all - and they make excellent gifts! They come in three sizes, so make one for every member of your family! Yarn from @lovecraftsknitting and free pattern in the profile link #knitstagram #knitting #knittersofinstagram #knittersgonnaknit #knittingpattern #knittinginspiration #freeknittingpattern
A twisted headband is the perfect gift for the hol A twisted headband is the perfect gift for the holidays! This headband is knit in fisherman’s rib - a classic stitch with a dramatic stretchy rib. Grab the free pattern and tutorial in the link in the profile and cast on! #knitting #knit #knittersofinstagram #knitknitknit #knittersgonnaknit #knitting_inspiration #knitstagram #freepattern #freepatterns #headband

Search The Site

Stay in Touch

  • Facebook
  • YouTube
  • Instagram
  • Pinterest

2022 Copyright © Sheep and Stitch Limited

Pin
Share
Tweet
Let's Stay
In Touch

Sign up for new patterns, sales and exclusive giveaways. 100% good stuff!


no thanks

{"cookieName":"wBounce","isAggressive":false,"isSitewide":true,"hesitation":"","openAnimation":false,"exitAnimation":false,"timer":"","sensitivity":"","cookieExpire":"30","cookieDomain":"","autoFire":"40000","isAnalyticsEnabled":false}