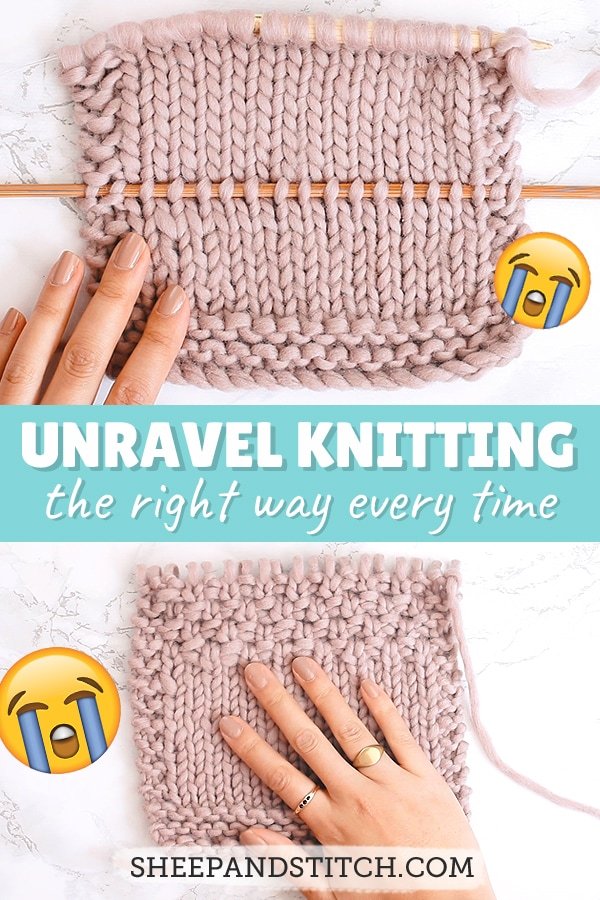
How to Unravel Knitting the Right Way
May contain affiliate links (what's this?)Unravelling your knitting, is a frustrating but necessary rite of passage for every knitter. Knitting mistakes are bound to happen. Sometimes the only way forward is to unravel the knitting and start again.

It can be painful to watch all those beautiful stitches disappear with a simple tug. But once you’ve ripped back your knitting, a trickier situation arises: now that your stitches are loose, how will you put them back on the needle?
Just jam them back on willy-nilly?
Absolutely not!
There’s a right way and a wrong way to unravel your knitting. In this post, I’ll go over three ways to do it, plus my preferred method.
A Note about Twisted Stitches
After unravelling, it’s important to ensure that your stitches are not twisted when they’re placed back on the needle.
What’s a twisted stitch, you ask?
Great question! To understand a twisted stitch, let’s first look at the anatomy of a stitch.
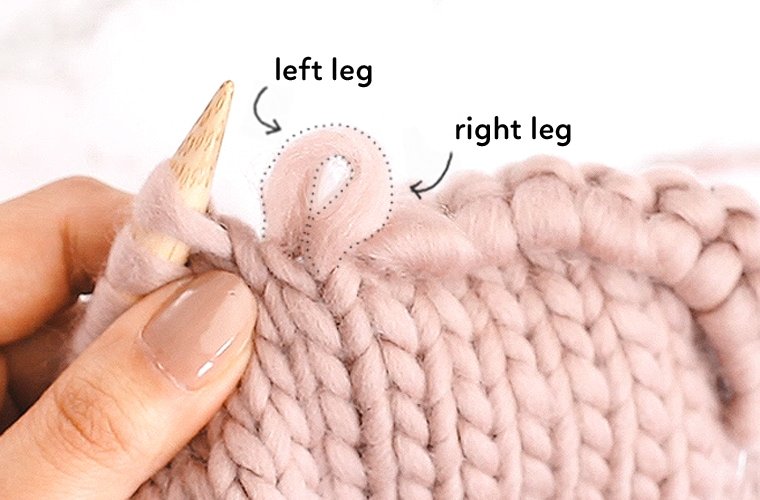
A stitch looks like a loop. It has a right and left side. For the sake of the following analogy, let’s call them right and left “legs.”
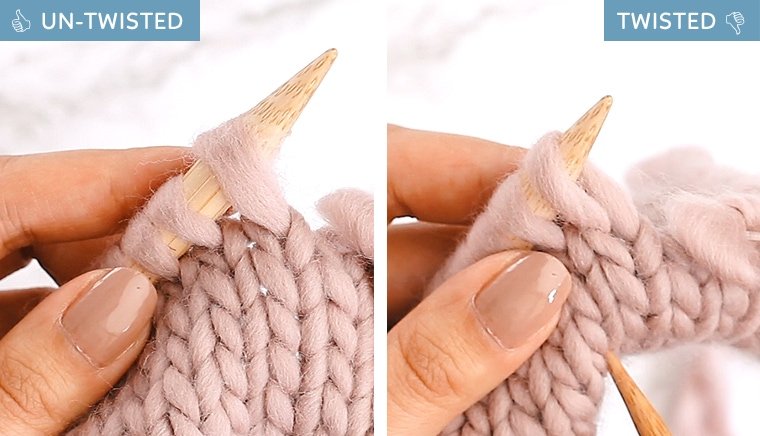
When you knit a stitch, its right leg will automatically be on the front of the needle. This is what we call an “un-twisted” stitch. When the right leg of a stitch is in the front, the stitch is un-twisted and seated correctly on the needle.
However, when the left leg of the stitch is on the front of the needle, the stitch is twisted. This is a no-no.
While a twisted stitch is not the end of the world, it looks kind of funny and tightens the tension of the stitch.
The good news is that a untwisting a twisted stitch is super easy. If the left leg of the stitch is on the front of the needle (meaning it’s twisted), just pull the stitch off the needle, turn it around and place it back on the needle so that the right leg is on the front. Like this:
So what does this have to do with unravelling yarn?
When your stitches are loose from unravelling, their legs will be all mixed up and facing every which way. So, when you pick up these loose stitches, you’ll want to make sure that their right legs are all facing the front. The following three methods will go over how to ensure your stitches are un-twisted.
Method 1: For Unravelling a Few Stitches
If you need to unravel more than one row, then move on to Method 2 or 3 (preferred). If only a handful of stitches need unravelling, then this method is perfect:
- Use your left needle to stab into the stitch directly below the stitch you want to unravel
- Then carefully drop the stitch from the right needle
- Pull the working yarn to unravel the stitch
- You have now unravelled one stitch that is also un-twisted. Huzzah!
Method 2: An Inefficient (but Popular) Way to Unravel Rows
This is not my favourite method for unravelling, but it’s very popular among knitters. You’ll probably recognise it.
It involves yanking the needle off the knitting and furiously pulling the working yarn so that rows upon rows of knitting unravel in a flash, like so:
This is not a terrible way to unravel, but it’s slow because once you’ve decided on a spot to stop unravelling, you must begin the tedious work of corralling the loose stitches back onto the needle. It’s also unsafe because those loose stitches could drop, creating even more drama. Once the stitches are back on a needle, your work is not yet done.
Why?
Remember our talk up top about twisted stitches? While the stitches are safely on the needle, their configuration is totally mishmash-ed. Some stitches will be twisted, while others are un-twisted.
To ensure all the newly migrated stitches are un-twisted, you’ll need to carefully vet them one by one. Start by moving the stitches from the rescue needle to a second needle, un-twisting any twisted stitches during the migration. The process looks like this:
After unravelling, rescuing the stitches, ensuring the stitches aren’t twisted, you’re finally ready to start knitting again. Such tedium!
Method 3: My Favourite Way to Unravel Rows of Stitches
Okay, so here’s my preferred way for unravelling. I love it because it’s:
- Safe the stitches are never loose and off the needle.
- Precise because you decide in advance the point at which you will stop unravelling
- Quick because you ensure the stitches are un-twisted before unravelling.
The best way to show you how to work this method is through the medium of song and dance.
Just kidding!
It’s video. Watch this super short video for a quick overview:

Pretty cool, right? For a more detailed walkthrough of Method 3, head to the top of the page and watch the video at the 9:25 mark.
So, now you know three way to unravel your knitting. Knock on wood you won’t need to use these techniques often, but if you do, you’ve got the skills to unravel like a pro!
I’ll leave you with a fun piece of trivia: some knitters call unravelling “frogging” because it’s descriptive of what happens to your kitting: “rip it, rip it, rip it,” which sounds like the sound that a frog makes: “ribbit, ribbit, ribbit.”
Get it? It’s not the wittiest pun, but it’s stuck, and is now part of modern knitting vernacular. So if you want to impress your knitting friends, talk about “frogging” instead of “unravelling.” You’re welcome!

Wow! I learned so much!
When unraveling the “best way,” I find feeding a size smaller needle across stitches is easier. Once transferred and unraveling is complete, begin knitting back onto the larger needle.
Omg, thank you!
I have to unravel several rows because I got carried away and did too many and I was dreading trying to pick up every stitch again!
Oh dear! As a nubile knitter I am unsure about EVERYTHING and you have saved me from myself more than a few times! I, too, got carried away and had 6 too many rows and your “Best Way” saved the day!! THANK YOU! You are the best!
whenever I do this – when I unravel and then start knitting again the row where I unraveled to always ends up having the stitches look long and stretched – how do I avoid that?
I’ve created a real predicament for myself. Knitting an Afghan. I had cast on 192 stitches of knits, purls and cables and already knit about 200 rows. Just realized an error 5 rows back where I knit instead of purled on the last 15 stitches. Is it possible to frog back only those affected 15 stitches and 5 rows and leave the rest of the 177 stitches on the needle in tact to correct my mistake ? Thank you so much for your time AND whatever help you have to offer.
Brilliant tips. Thank you
When unraveling the “right way”, can this method be used with the knit stitch?
Yes absolutely! It’s probably the easiest with the knit stitch/aka stockinette stitch
Hei!
Thanks for this great tutorial! Can the “right way” also be used when knitting in the round?
Yes absolutely!
Thank you, you just saved my project!
Method 3 has saved me a few times. Thank you!
Can I use the same method for ribbing?
this is how I find out my stitches are twisted in every single thing (3) I’ve ever made lol
wait my stitches aren’t actually twisted they just look like they are? I think because of the twist of the yarn strands. when I’m not stretching everything out it wants to naturally twist on one side and against the yarn twist on the other leg. so it creates this column of extra twisty stitches. if that makes sense. do you know what I’m talking about and have any tips on how to avoid this? thank you 🙂 btw I love your website and videos