How To Knit for Beginners
The Ultimate Guide
This guide will show you everything you need to get started with knitting.
First, you’ll learn how to get yarn onto the needles. Then, you’ll learn how to make the all-important knit stitch. Lastly, we’ll go over how to get your knitting off the needles.
We’ll also cover common beginner mistakes and how to fix them. Finally, I’ll introduce beginner patterns and a roadmap for what to knit next.
Sound good? Let’s dive in!

Knit in Four Simple Steps
Knitting boils down to four essential skills. These are the slip knot, cast on, knit stitch, and the cast off. These techniques make up the backbone of knitting. Master them and you’re officially a knitter. It’s that simple!
MATERIALS
Gather big yarn and needles and let the adventure begin!
SLIP KNOT
It all starts with a humble slip knot.
CAST ON
Transform loose yarn into neat stitches.
KNIT STITCH
The simple stitch makes up the backbone of knitting.
CAST OFF
Get your knitting off the needle and wear it out and proud!
Before You Begin
Knitting Materials: Gather Your Supplies
To knit, you’ll need needles and yarn. That’s it! But where to buy them? And what kind of needles and yarn? Thick or thin? Wood or plastic? The options are endless!
YARN: I always recommend a chunky yarn and correspondingly thick needles for beginners because they’re much easier to grip.
In these tutorials I’m using Lion Brand’s Hometown (in color Fort Lauderdale Coral) and 9mm needles.
You don’t need to use the same yarn as me, but try to get yarn that’s at least a medium weight (aka. worsted weight) or thicker. Thinner yarns are harder to control. Not sure what “yarn weight” is? Check out this brief guide to yarn weights.

Lion Brand Hometown Yarn
This affordable yarn comes in a variety of colors and is the perect super bulky weight for beginners. With a fiber content of 100% acrylic, this yarn is machine washable, dryable and super soft. It’s a favourite for beginner knitters.

10mm Bamboo Knitting Needles
I love wood or bamboo needles for beginners. This natural material has a natural surface drag that helps “grip” the yarn. “Grippiness” prevents stitches from slipping around the needle, which is a common concern for beginners.
TIP: If you’re buying yarn and needles, choose cheap acrylic yarn so that mistakes won’t feel like such a big deal. As a beginner, you’ll make mistakes – and that’s totally normal!
Mistakes are part of the journey, and they’ll hurt less if you’re using inexpensive yarn as opposed to pricey artisan yarn.
NEEDLES: I recommend wood or bamboo needles for beginners. Wood and bamboo have a natural surface drag that “grips” the yarn and make it less slippery than steel or aluminium needles. Plastic needles are okay too.
If you have the choice, go for bamboo or wood. Otherwise, use whatever’s available!
SIZE MATTERS: What needle size do you need? It depends on the yarn you use! When you buy a ball of yarn, the yarn label will usually include a “recommended needle size” listed in millimetres.
Follow the yarn label when you’re first starting out. Going up or down a millimetre won’t be a big deal, but any more and your knitting might be too tight or too loose.

1. Tie a Slip Knot
While it’s not technically a cast on stitch, the slip knot is the first stitch you’ll create on your needle.
Once you’ve created your slip knot, place it on your needle. It acts like an “anchor” for the following cast on stitches.


Leave a generous yarn tail & pinch yarn with both hands

Hold the yarn and bring the hands together to make a loop

Hold the loop that you have made in one hand

Grab the yarn that’s unattached to the ball & bring it behind the loop

Pull the strand of yarn through the loop

This little loop is called a slipknot. You’re ready to cast on with it!
2. Cast On: Getting Stitches On The Needle


Place a slip knot on the needle and pull yarn tails to tighten

Grab the short yarn tail and give a thumbs up

Swing the thumb behind the yarn

Hook the yarn onto your thumb. Keep a firm grip!

Touch the needle to the front of the thumb…

…and slide the needle into the loop on your thumb

Hold the needle, grab the yarn attached to the ball with right hand

Wrap the yarn around the needle, from the back to the front

Pull down the yarn so it meets the loop on the thumb

Pull the loop on your thumb over the needle.

Place the loop on the needle

Pull down the yarn tail to tighten the new stitch! Repeat steps 2-12
3. Knit Stitch: The Foundation of Knitting
You’ve learned how to turn yarn into stitches – good job! But they can’t just sit there like bumps on a log. They’re waiting to be knit!
The knit stitch is the most basic stitch. After all, it’s the namesake of the craft we’re learning. Master the knit stitch and you, my friend, are a bonafide knitter.


Insert right needle into first stitch, bottom to top

Push right needle into the stitch

Grab the yarn attached to the ball of yarn

Wrap the yarn around the needle, back to front

Pull yarn down and notice the yarn peeks through the stitch

Gently pull the needle down and pick out the yarn on the needle

Push the right needle into the loop. This is a new stitch!

Pull the right needle off the left needle

Pull yarn attached to ball of yarn to tighten stitch. Repeat steps 1-9
PEP TALK: Like most skills, knitting takes time to perfect. You probably won’t get the hang of it on your first try. You probably won’t even get it on your second try. The important thing is to keep trying.
Why?
You’ve heard the concept of “muscle memory,” right? It’s the idea that the more you repeat a movement, the more it becomes second nature.
Because the movement is controlled by your subconscious mind instead of your conscious mind, you don’t need to think through each step of a movement. Without thinking, you can just do it. That’s muscle memory!
When you first start knitting, your hands will feel big and clumsy holding those knitting needles. But after practicing, your hands will learn the movement of knitting. It’s almost like your hands have their own brain!
Think of it like learning how to drive. As a new driver, you probably concentrated really hard on how to turn the wheel.
Are you turning too hard?
Will you hit the curb?
Oh my gosh, the light turned yellow. Hit the brake!
You’re a nervous, sweaty mess. But with practice, you learned how much to turn the wheel and how to ease into a stop so you don’t get whiplash. After awhile, driving becomes second nature. Your hands and feet figure out how to coordinate with your eyes and brain to move your car around – no easy feat! That’s the miracle of muscle memory.
So, don’t fret if you don’t get the knit stitch right away. Most people don’t. The more you practice, the faster muscle memory will kick in. Before you know it, you’ll be knitting with your eyes closed. You have muscle memory to thank for that!
3.5 You Spin Me Right Round
Here’s some knitting vocabulary for you: those cast-on stitches on your needle?
That’s called a ROW. Or more specifically, a row of stitches.
When you’ve knit to the last stitch on your needle, that means you’ve knit the whole row. Woohoo! That’s a big deal!
So, now what?
Okay, notice that after you’ve completed your row, the yarn is at the left side of your row (aka. the end of your row). In order to keep knitting, you need the yarn at the right side of the row (aka. the beginning of the row).
How to do this?
It couldn’t be easier!
Just spin the needle around. Ta-da!
The working yarn (aka. the yarn attached to the ball) is now at the right side of the row, and you’ve got a new row of stitches, ready to be knit!
Each time you get to the end of the row, just spin your work around so that the working yarn is on the right. Keep going until your knitting is as long as you want it to be.

At the end of the row, your needle will be facing left.

Turn the needle around so that it faces the right

The needle now faces the right. Pick up the bare needle and continue knitting!
4. Cast Off: Getting It Off The Needle
At this point, you’ve got some rows of knitting under your belt. You should be very proud of yourself! You’ve used two sticks to transform a loose bundle of string into a neat little rectangle. Amazing! Now it’s time to get your knitting off the needles.
The cast off will get the job done. This technique is awesome because it means that your project is complete! It’s all grown up, ready to fly off the needles and enter the real world!

TIP: When casting off, remember that you always need TWO STITCHES on the right-hand needle to cast off. No more and no less. Casting off is a game for two (stitches).

Knit two stitches

Slide left needle into first stitch

Pull the first stitch over the second stitch

Continue to pull the first stitch over the second stitch and off the needle

There is now one stitch on the right needle. The other has been cast off!

Knit one stitch. Repeat Steps 2-6 until one stitch remains

When one stitch remain, cut off a 10″ yarn tail

Wrap the yarn around the needle

Pull the stitch over the yarn tail

Pull the yarn tail through the needle

Pull the yarn tail to tighten it up

Your knitting is now safely and securely off the needle!
Congratulations! You’re a Knitter!
“Ce-le-brate good times, come on!”
Your knitting is off the needles! This is big!
You tied a slip knot, conquered the cast on, nailed the knit stitch, spun your needle ’round, and catapulted stitches over each other to cast off.
You, my friend, are a capital-K, grade-A Knitter!
*wipes tear* I’m so proud of you!

How To Fix Knitting Mistakes
Okay, let’s get real. Not everyone will have a smooth, carefree journey from new knitter to knitting guru. You’ll likely encounter knitting mistakes along the way.
These include: new stitches mysteriously appearing on your needle, knitting that’s too tight or loose and little holes appearing in your work.
These issues are 100% normal for a beginner, so don’t fret! Here’s a quick overview of the three most common knitting mistakes for new knitters.
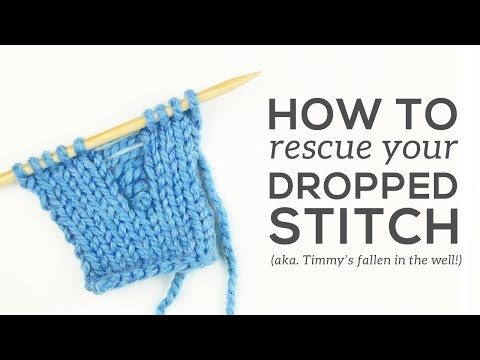
Knitting Mistake 1: Dropped Stitches
When a stitch falls off the needle, this is called a “dropped stitch”.
You’ll recognise a dropped stitch by a long tear in your fabric and a wayward stitch at the bottom.
When this happens, don’t panic! As frightening as a dropped stitch looks – so sad and helpless, like a child fallen into a well – it’s nothing to fret about.
A rescue mission is simple and straightforward. Watch the tutorial video below to see it in action. Or visit the Dropped Stitch technique page for an in-depth demonstration.
Knitting Mistake 2: Tight Knitting
When you first start knitting, you’re excited, nervous and kind of happy! Knitting is fun, after all!
But sometimes the nervous side takes over and you start gripping the needles and yarn tightly. You’re nervous your stitches will fall off, so you’re being extra careful.
But the knitting becomes so tight that you can barely get the needles into the stitches.
Watch the video tutorial below for my best tips to overcome this common knitting mistake. Or visit the How to Fix Tight Knitting technique page for a more in-depth demonstration.

1. First, try switching to a larger pair of needles. This should loosen up the knitting considerably. Try going up by 0.5mm increments.
2. Oftentimes, tight knitters will knit using the tip of their needle without letting the stitch slide all the way onto the needle.
This doesn’t expand the stitch to the full width of the needle – only a fraction of its width! That’s why the stitches are so tight. So, make sure to push the stitches onto the whole needle.
3. Knitting is a bit like learning a new language for your hands. Just as it takes time and practice to be fluent, it also takes time for your hands to learn the language of knitting.
Once your hands become more comfortable knitting, they will naturally loosen up and relax. So continue knitting and give it some time.
Knitting Mistake 3: Extra Stitches and Holes
At some point, you might look down at your knitting and think,
“Whoa! Why do I have so many stitches on my needle?”
You’ve got more stitches than you can cast on! You, my friend, have added extra stitches to your knitting through accidental yarn overs.
These extra stitches often result in holes in the knitting.
There’s one way to fix an added stitch, but it requires that you keep your eyes peeled so that you can catch the little sneak before it gets embedded into your knitting.
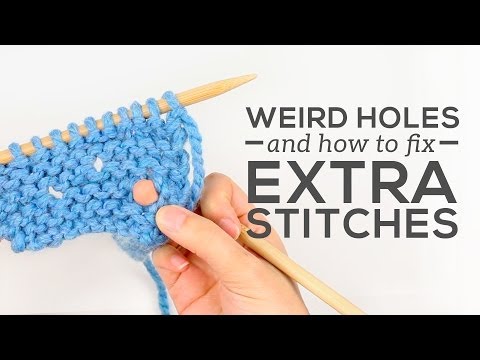
Check out the technique page on how to fix extra stitches here, included a photo guide.
Beginner Knitting Patterns
Knit Your First Scarf
Once you’re comfortable with the knit stitch, you’re ready to knit your first scarf. How exciting!
Cast on a number of stitches that is roughly the width you want your scarf to be. Start knitting until your scarf is the length that you like. Then, cast off. That’s it!


My preference is for long, luxurious scarves that wrap around my neck once with a generous length hanging down either side – but that’s just me!
Some like ’em short while others seek a middle ground. If you’re not sick of me, we can knit a scarf together in this scarf tutorial!
Skills used: cast on, knit stitch, cast off
Difficulty Level: 1/5
Knit a Beginner Hat on Straight Needles
Learning how to knit a hat is a fun and rewarding experience. If you’ve just completed your first scarf, and you’re looking for a new challenge then this hat is it!
The hat is knit flat on straight needles and then seamed together with mattress stitch for an invisible join. Check out the full pattern page here for the Blank Slate Hat. We’ll go through all the steps together!


Skills needed: cast on, knit stitch, purl stitch, decreasing, seaming.
Difficulty Level: 2/5
Pattern Library for More Projects
Do you have the knitting bug? Are you itching to cast on a new project? If so, check out the pattern library for inspiration.
Go ahead and pin your favourite projects, save them for later, or cast on right away! The pattern library includes a mix of free and premium patterns, along with video tutorials that walk you through each step.


Once you’re comfortable knitting back and forth on straight needles, consider moving up to knitting in the round with circular needles and double-pointed needles. This will open up a whole world of knitting patterns to you – hats, socks, and finally, the sweater!
Knitting a sweater a milestone for any knitter. To walk beginners through the exciting journey of sweater-knitting, I’ve created a full course for your first sweater – the Everyday Raglan!
Visit the Knitting Pattern Library here.
Pin For Later

